Hi friends! Ready for the new series here on IHOD? I am working with some experienced entrepreneurs I admire to bring you some fantastic Tips 2 Take With You! I know starting out my business venture, I would have LOVED to have a guru tell me all the ins and outs and ups and downs. I had some help from the blogosphere, and some I had to figure out all on my own. So, my thought is, if I can help some you starting entrepreneurs in a small way, this will be worth it for me! I have been asked many questions about starting a business, and hope to address some of those questions. If you think of anything you would like to learn more about, leave a comment or shoot me an email!
To start, here is a topic I believe every etsy artist, retailer, and shop owner has researched at least a few times. HOW TO GET OUSTANDING PHOTOS for your products! I recently asked Megan of Lilac Saloon how she got her gorgeous wallflowers so picture perfect and she so kindly typed out the info step by step for me! She is a sweetheart! I knew I had to have her as the first guest to share her wisdom with us!


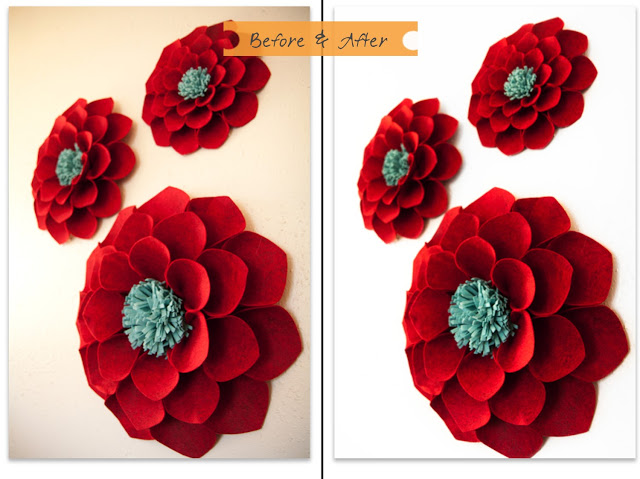
White Backgrounds Made Simple – Instructions for Photoshop
Layer, New Adjustment Layer, Brightness/Contrast
(check box: use previous layer to create clipping mask)
-Crank the brightness up all the way to make your background completely white
– If NEEDED: With the Adjustment Layer selected, paint with black over the product using the soft edged brush (preserve a bit of the shadow below the product).
– Paint brush with white over areas that may have too much shadow, to erase it. Click on the “Background” layer and add another adjustment Layer for Brightness/ Contrast
-Bring up the contrast a bit if necessary to give the product a bit more saturation (works great for making the black look more rich and the white look more white).
White Backgrounds Made Simple – Instructions for Lightroom 3
-In the Develop Module, change the background to white by right clicking in the blank space that surrounds the photo and select White. With the background white, it will help us see that the white space we’re correcting in the photo is in fact pure white.
– Choose the Adjustment Brush (paintbrush) and choose Brightness as the Effect. Slide the brightness up all the way to the right and slide Saturation all the way to the left (this will give us grey shadows).
– Increase the size of your brush so that it’s very large because you’re going to quickly paint over the entire image with the brush – so, the bigger the better. Paint over the whole image which will whiten that background but also make your image completely greyscale.
– Now, choose the “Erase” brush while you are still in the toolbar for the Brightness Adjustment Brush. Slide the Feather up all the way to the right and reduce the size of your brush so that it’s small enough to color over your product in pretty good detail and around your edges. With Feather, it gives the brush a very soft edge and so you will not need to be perfect or worry about sharp contrast from the background to the product.
– Zoom in on your product and begin ‘erasing’ over your product. It will look like you are coloring in with color, over your product. Erase over your entire product!
– Lastly, you can bring the brightness down just a touch if you need to reveal the shadows a bit more but just watch the white of the background so it doesn’t start to get grey.
This is only ONE way of creating this effect, but it works for me! Experiment with it and fine tune it so that it works for your products and your photos. I hope it helps give your photos a boost! ~ Megan
If you would like to download these steps in a Word Document you can do so here:


