DIY Garment Clothing Rack

November 3, 2014

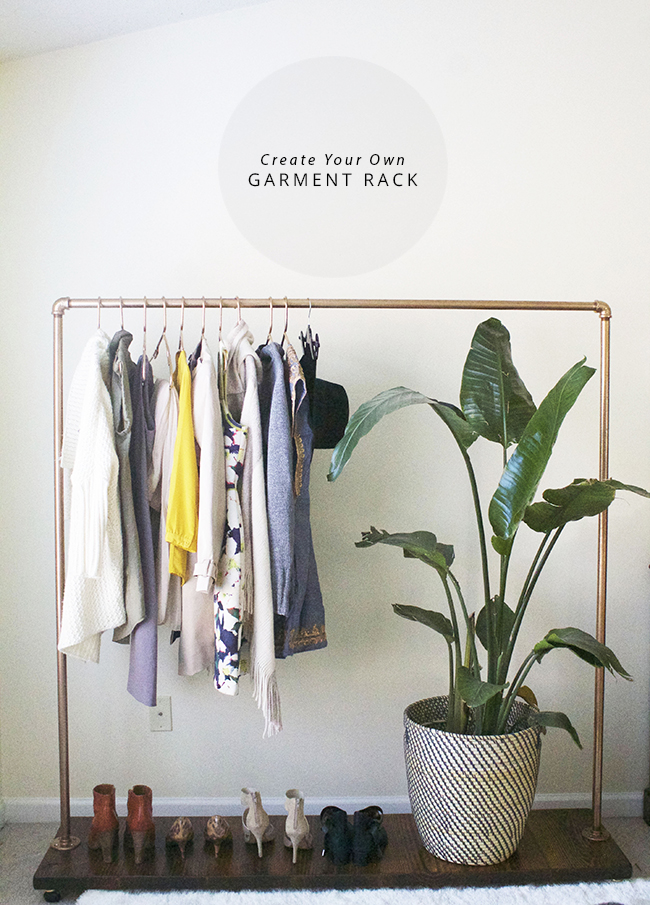
I was in sore need of a good garment rack for some upcoming shoots, so with a gentle nudge, I managed to lasso Gabe for another project to share with you all;) This is a DIY garment rack project that you can use in your own home, which might be a good option for you if you are short on closet space! I am learning how to use the power tools, but this beauty was made by Gabe alone (minus the spray paint finish;)), and so he is taking over today to share step by step instructions. Feel free to leave your questions in the comment section for us to answer or shoot us an email!


 DIY Garment Rack with Instructions www.inhonorofdesign.com

 
DIY Garment Rack | In Honor of Design
 Garment Rack

DIY Garment Clothing Rack


Supplies

Wood for your base (Please see below regarding base)
2 – 2x2x8 (or 2x4x6) for extra support under the base.
3 – 3/4in x 5ft black pipe
2 – 3/4in 90 degree black pipe elbow
2 – 3/4in threaded floor flange
1 – box of screws (The length depends on the thickness of the wood chosen for the base.)
4 – wheels (I used hooded ball swivel plate casters.)
2 – spray paint (Anna chose a Rustoleum in copper. Be sure that the paint is designed for metal)
Stain and varnish or finishing oil of your choice
Power drill

Note regarding the base – You can use just about any wood of your choice for the base. It all depends on your price point, desired looks, and amount of time you wish to sink in. It is easy to find your desired width of board at your local lumber yard or large hardware store. Simply cut to your desired length. If you are looking for a thicker look, you will need to use 2×10 boards and bind them together length wise using pocket screws or a biscuit jointer, and fill the crack with wood filler. Don’t be intimidated by that last part it is very easy. I used scraps of 2×10’s jointed together because that is what I had on hand and like the look of it. If you want to join multiple boards together I highly recommend the biscuit joint method. You can pick up a biscuit jointer for about $100 dollars and is well worth the investment if you are a DIYer, especially due to their ease of use.

Step 1 – Cut the wood.
Your base needs to be a minimum of 5′ 4″ in length because the elbows and floor flanges will add a bit of extra length to your pipe. I recommend going slightly longer to leave a little room for mistakes. Your base supports should be a few inches shorter than the base itself so that they will be unnoticeable when looking at the rack from a normal standing position.

Step 2 – Construct/prep the base for finishing.
Depending on what you chose for your base, you may need to join boards together or sand them down a bit, especially if any wood filler was used. If you will be sanding always follow the grain of the wood. Add your base supports to the bottom of the base at this time also.

Step 3 – Attach the wheels to the bottom corners of the base.
Align and set each wheel plate side down on the underside of your base. Using a pencil mark the location of where each screw will be inserted. Drill pilot holes at each of the markings being careful that you do not drill though the base. Secure the wheels to the base.

Step 4 – Finish the base.
I like to use a wood conditioner before I stain wood. You do not have to, but it can help to avoid blotchy color. Choose and finish with your choice of products following the instructions found on the can. We used Varathane Dark Walnut stain and finished with three coats of a polyurethane finish.

Step 5 – Assemble and paint the pipes.
Assemble the pipes and and the floor flanges together. Then take any wood scraps (the longer the better) and screw them to the bottom of the assembled pipe frame. This will allow you to stand the frame upright and spray paint it without interference.

Step 6 – Attach the pipe frame to the base.
Once the paint is dry remove your scrap wood from the pipe frame and align it at your desired position in the base. Once again mark and drill pilot holes in preparation for attaching the piping to the base. Finally screw down the piping to the base and enjoy the finished product.

Check out the full step by step photos on the Steller app!


Best Ever Creamy White Chicken Chili Recipe

October 30, 2014

This is a long standing traditional favorite in my family during halloween week! Since it was my mother’s recipe, I have to vote that it is the best ever creamy white chicken chili recipe. Such a good comfort food option that you can make in your crockpot or over stove top. 

VIEW FULL POST

The other side of fear.

October 29, 2014

The other side of fear | Artwork by Jessica Keaela

I have been having trouble sleeping lately.

Anxiety, worry, doubt. It’s a triple beast. They can creep up and rule your life if you aren’t careful to battle them head on. And when any of these start to rear their ugly heads, I know something must be off kilter within me.

Fear can prevent your from loving without hesitation, it can prevent you from conquering old habits, it can prevent you from listening to your gut, and ultimately can rob you of some of the best things life has to offer. Joy, truth, authenticity…the fruits of a life of courage. I seek this with fervor, but don’t always win. 

Yesterday I read a first hand account from my friend caring for Ebola patients in Liberia. She knows day in and day out that her own life is at risk, but she CHOSE to serve. She chose to help the dying exit this life with someone by their side reminding them that they matter. She is a warrior in my eyes. She looks fear in the face and walks through it’s shadow to the other side of freedom. Freedom to LIVE as you were created to, and to LOVE without conditions.

I wanted to share this quote with you all that I stumbled on that has made it’s mark on me. I asked Jessica of Coco & Mingo to hand letter it for me as part of a series we are doing for The Brand Market. Isn’s she talented?! You can see the rest of the series here.

Have a fearless and mighty Wednesday friends. Why not?

x, Anna

I have this thing with floors.

October 24, 2014

After posting some sneak peaks of flooring/rugs on instagram, I was reminded about a few accounts I love that do a fantastic job of stretching the mind’s perspective and challenging you to see your life from different angles. I enjoy every post so thought I should pass it along:)

I have this thing with floorsIhavethisthingwithfloors Screen Shot 2014-10-24 at 1.50.44 PM From where I standblack and whiteI have this thing with floors

Must follows:
@ihavethisthingwithfloors | @fromwhereistand

Aren’t they fun? I hope you all enjoy!
Have a beautiful weekend. The last of October ahead which is completely unfair!
x, Anna

Autumnal Wear x 3

October 23, 2014

Yellow | IHODSweater Weather | IHOD
Sweater Dress | In Honor of Designautumn wear | IHOD

Look 1: Coat : Twice (similar here or here) // Sweater: Lillap NYC c/o // Coated Denim: Henry & Belle // Boots: Target // Hat: F21 (similar)
Look 2: Sweater: Lilla NYC // Coated Denim: Henry & Belle // Hat: Rag & Bone c/o
Look 3: Dress: Calypso St. Barth c/o //Hat: Rag & Bone c/o // Boots: J.Crew (similar)


It was time to bust out Colonel Mustard. It’s my very favorite in case you haven’t gathered I have a thing for yellow;)

A few more autumnal wear posts:
Which type of boot height do you prefer?
4 Lip colors for fall every woman can try.
Are you a ball cap, beanie, or fedora type of gal?


Happy almost weekend!
x, Anna


Bedroom Overhaul – Phase 2

October 22, 2014

Circlular Mirror | IHODDome lamp | In Honor of DesignIn Honor of Design

After we painted the walls and got the room ready for a fresh start, we planned out which furniture pieces would stay and which we would bring in. We were in desperate need of nightstands so Gabe designed and made these simple geometric ones. (We will post the how-to soon!) On the nightstand we brought in a few dome lamps sent from Kenroy Home. I loved the chrome color and how they curved towards you as if they are lending a helpful hand;) They have a good deal of pendant lights and desk lamp options to choose from. On to the next set of details. Textiles and Furniture pieces…

My dresser was a piece I up-cycled from an auction find. I re-stained it and added some Anthropologie pulls to add in a little color. Was so thrilled to find this statement mirror from Kenroy Home to balance out the wall space. It has deep studded grooves and a metallic finish which continues with the rest of the finishes in the room.

We have a few new carpet pieces I will show you all soon, and the full reveal coming in November. Have you seen any dresser tops that have tickled your fancy lately? Would love some examples!

x, Anna

(You can catch Phase 1 here.)

Transitional Travel Pieces

October 21, 2014

Travel Wear | In Honor of DesignFrom airplane to meeting wearTravel Layers www.inhonorofdesign.com

I have finally gotten the hang of travel wear. What goes through security easy, what is comfortable, and easy to transition from plane to meeting. I try to still dress presentable, so these pieces worked for airport, lunch meeting, or night out. Head over to Condé Nast to see the one travel outfit that will get you from morning till night (and outfit links!).

x, Anna

Photos by Chelsey Photography 

Copyright © 2025 In Honor Of Design powered by chloédigital