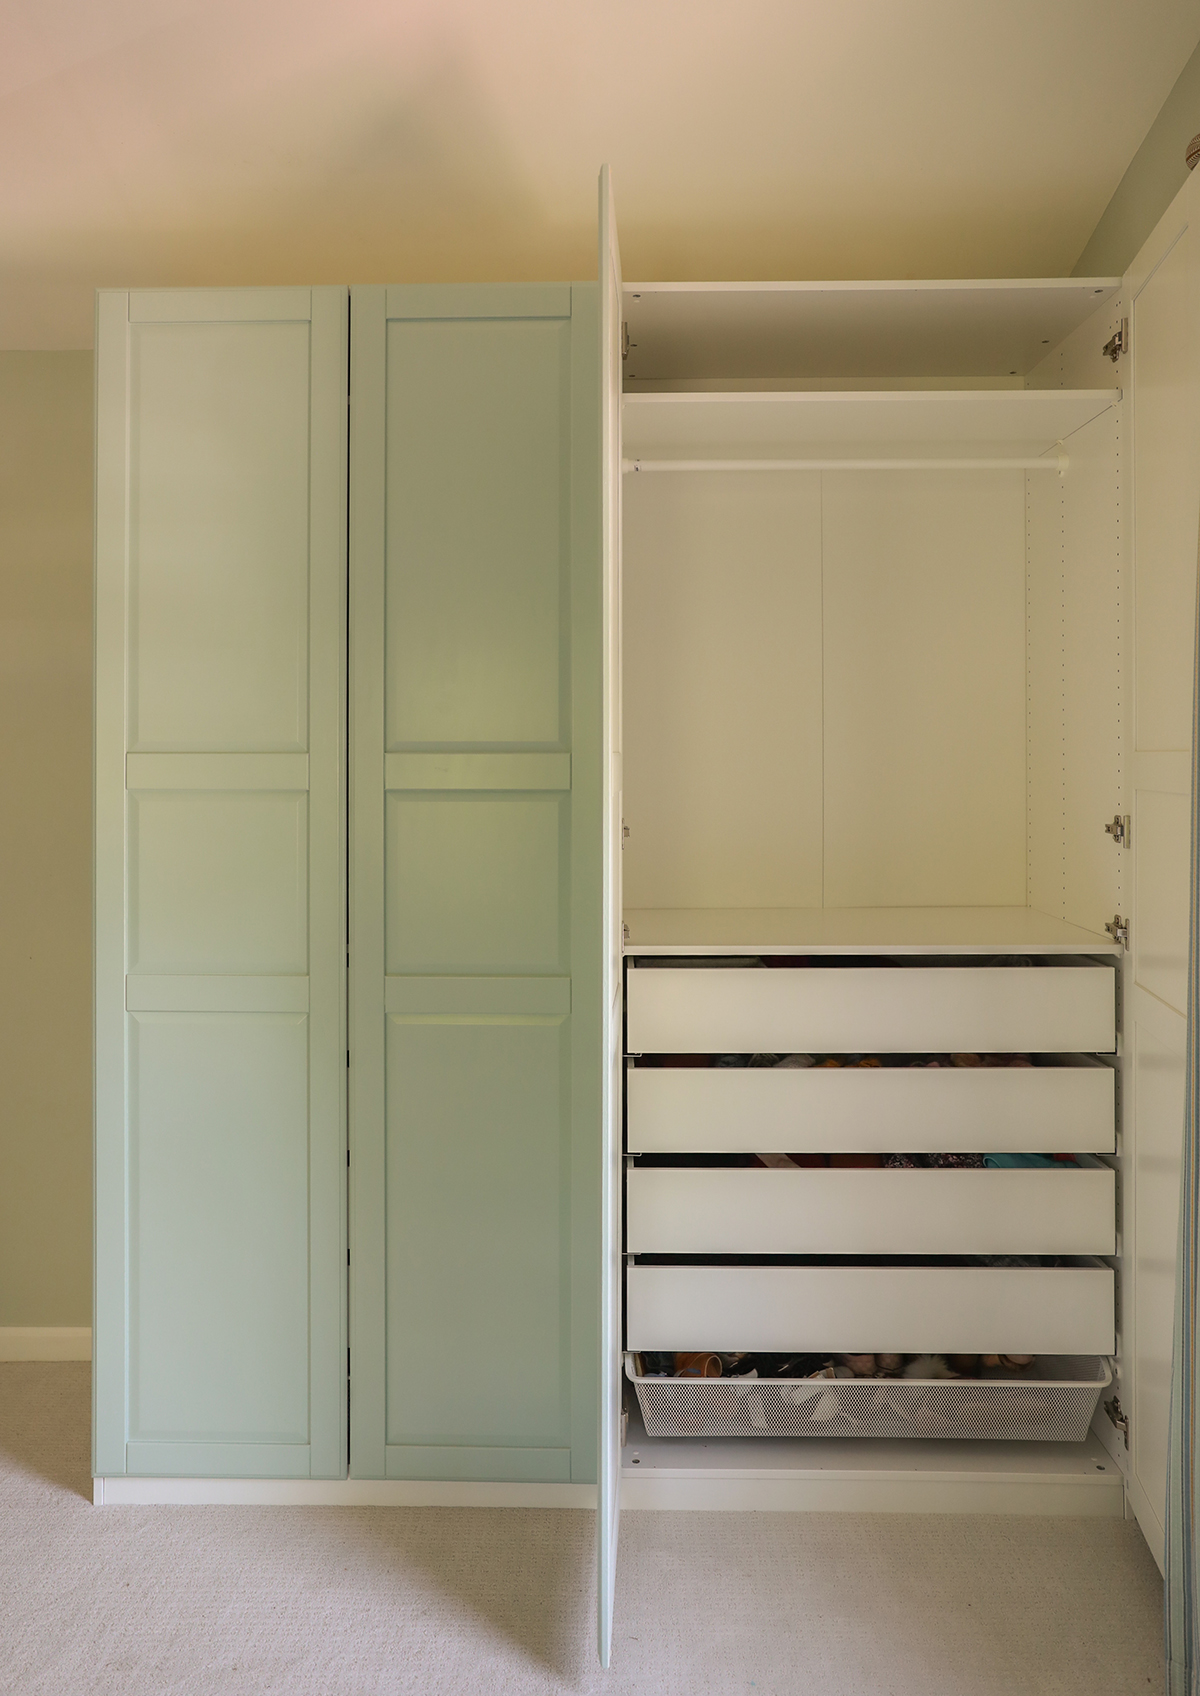
We have been working on the girls shared bedroom over the past year, and since it is technically a “bonus room”, it doesn’t have any closet space. We needed to come up with a solution to create some clothing storage for 3 sisters within a reasonable budget. Our options were wardrobes, dressers, or a built in closet. After debating best use of space, we decided to go for IKEA Pax wardrobes. They are tall, customizable, and VERY spacious. Today we are sharing the step by step of the customization process as well as the total cost.
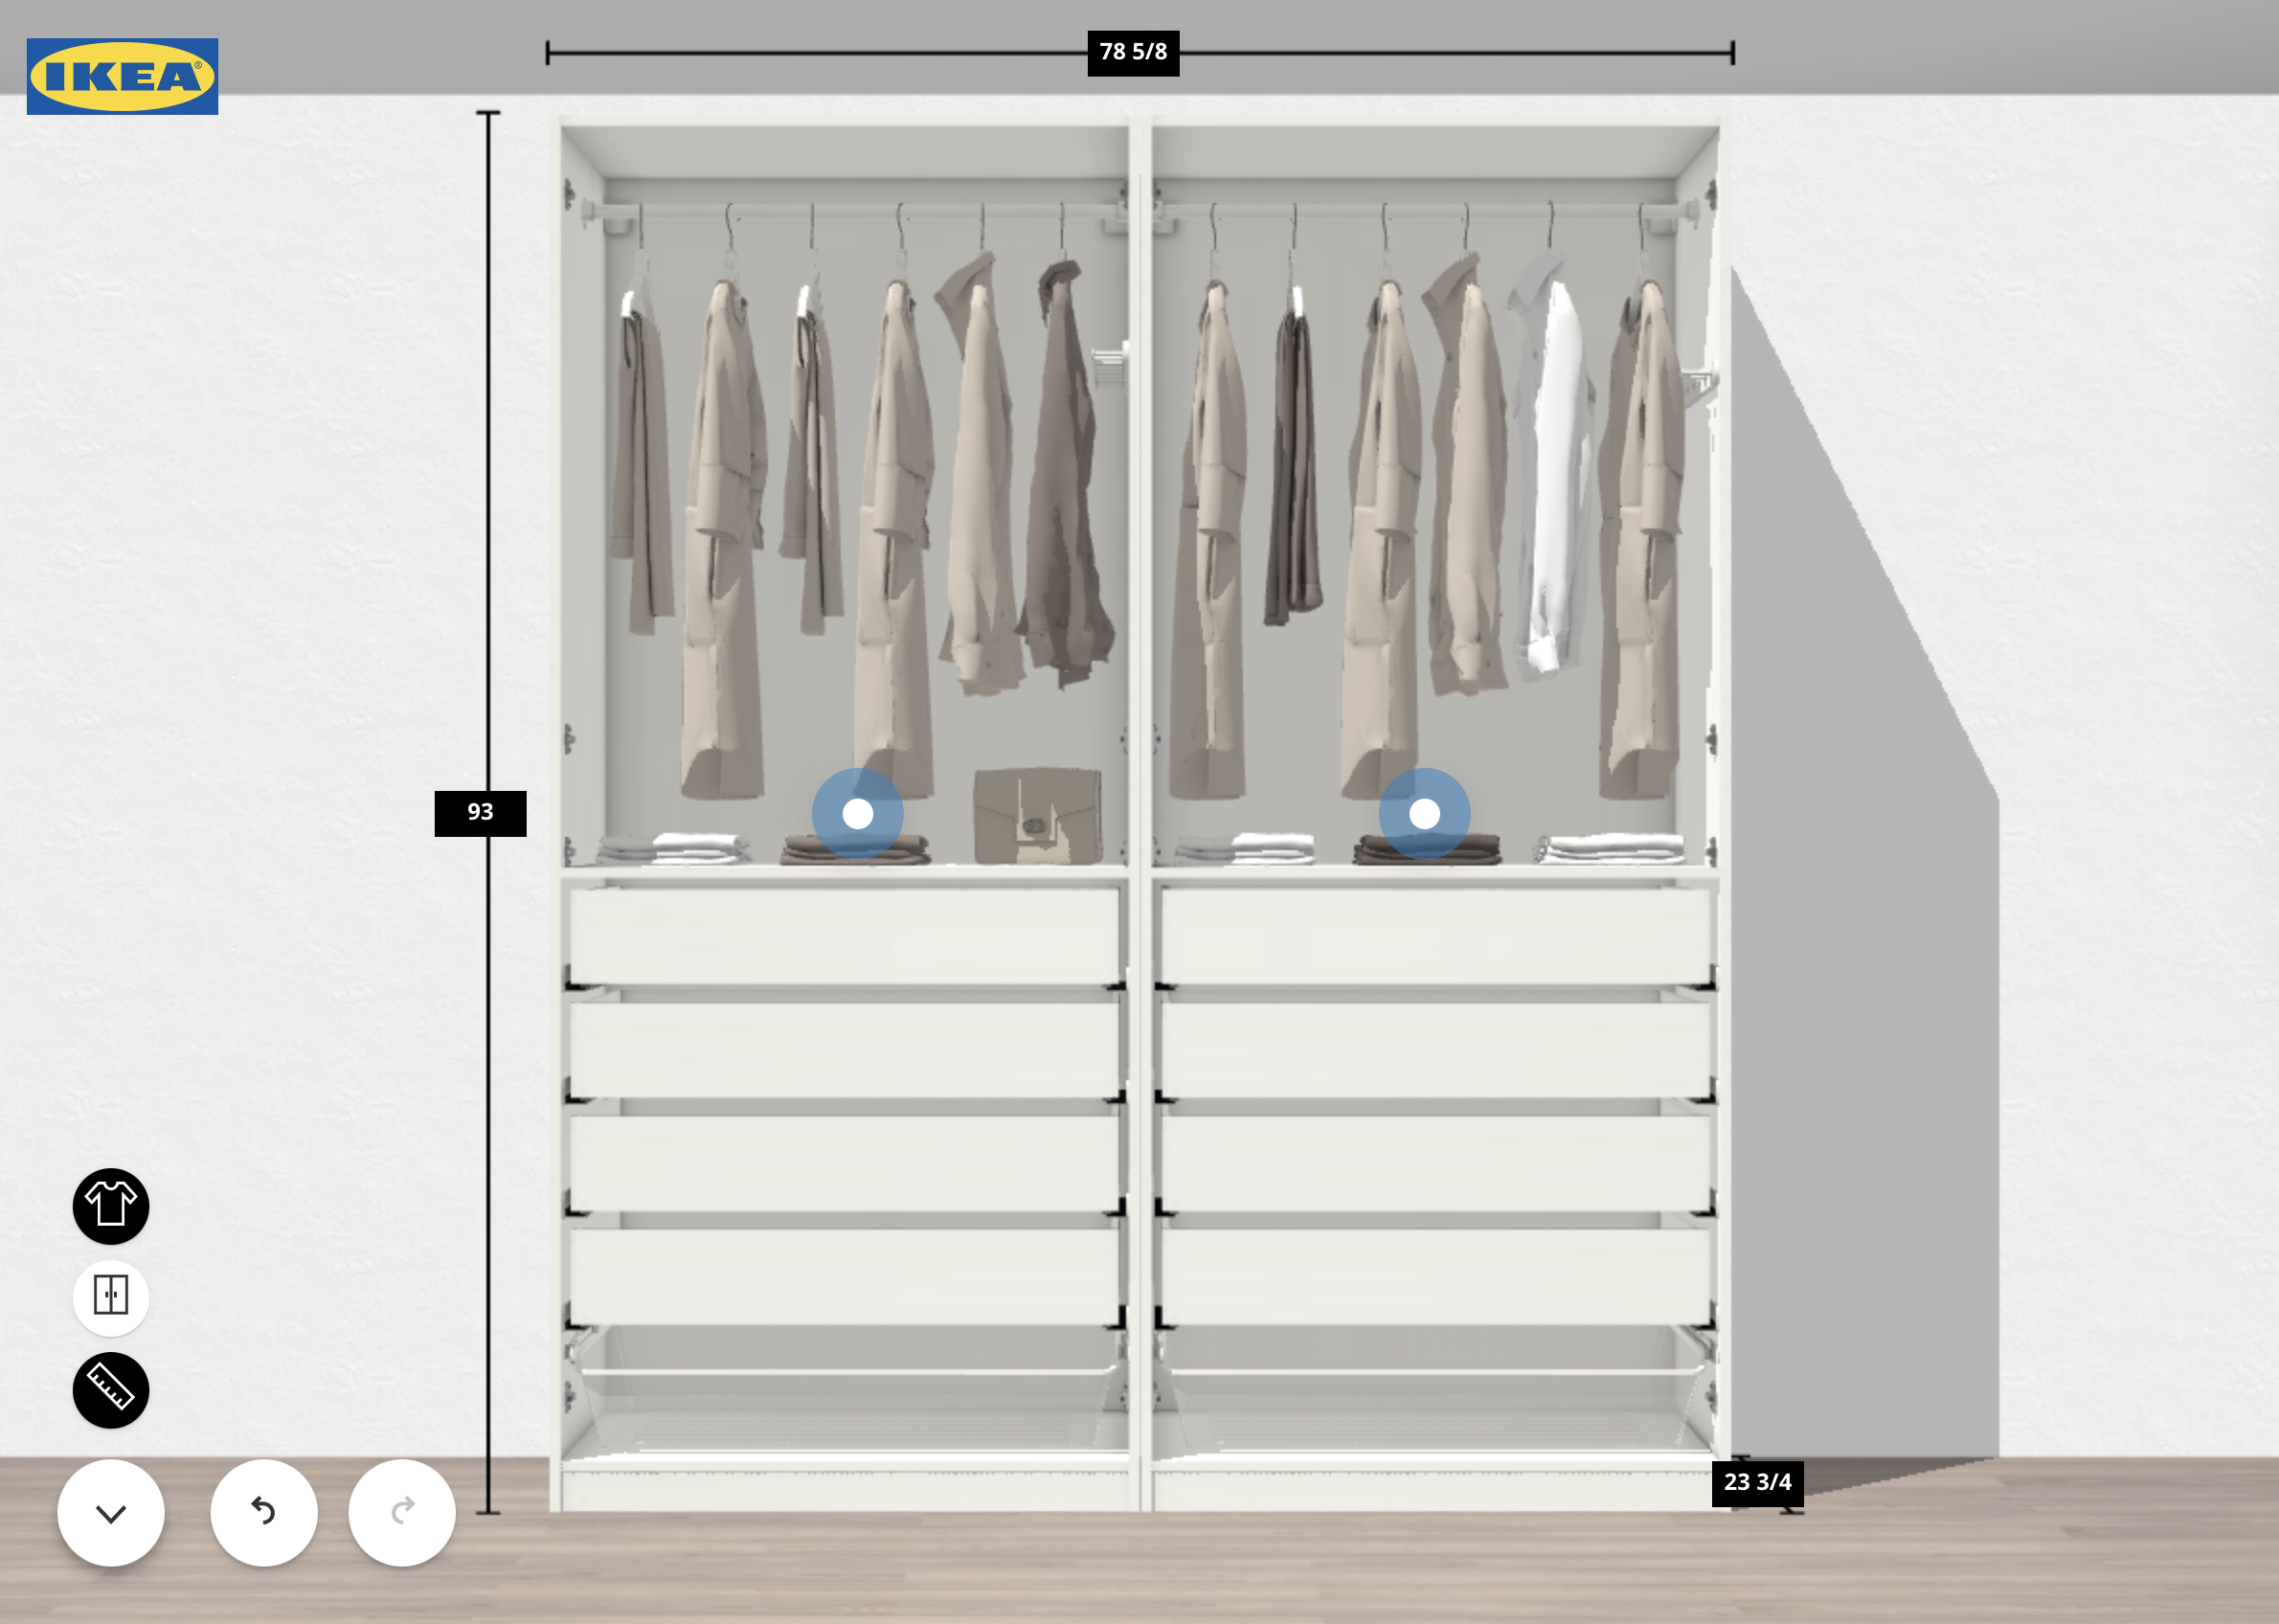
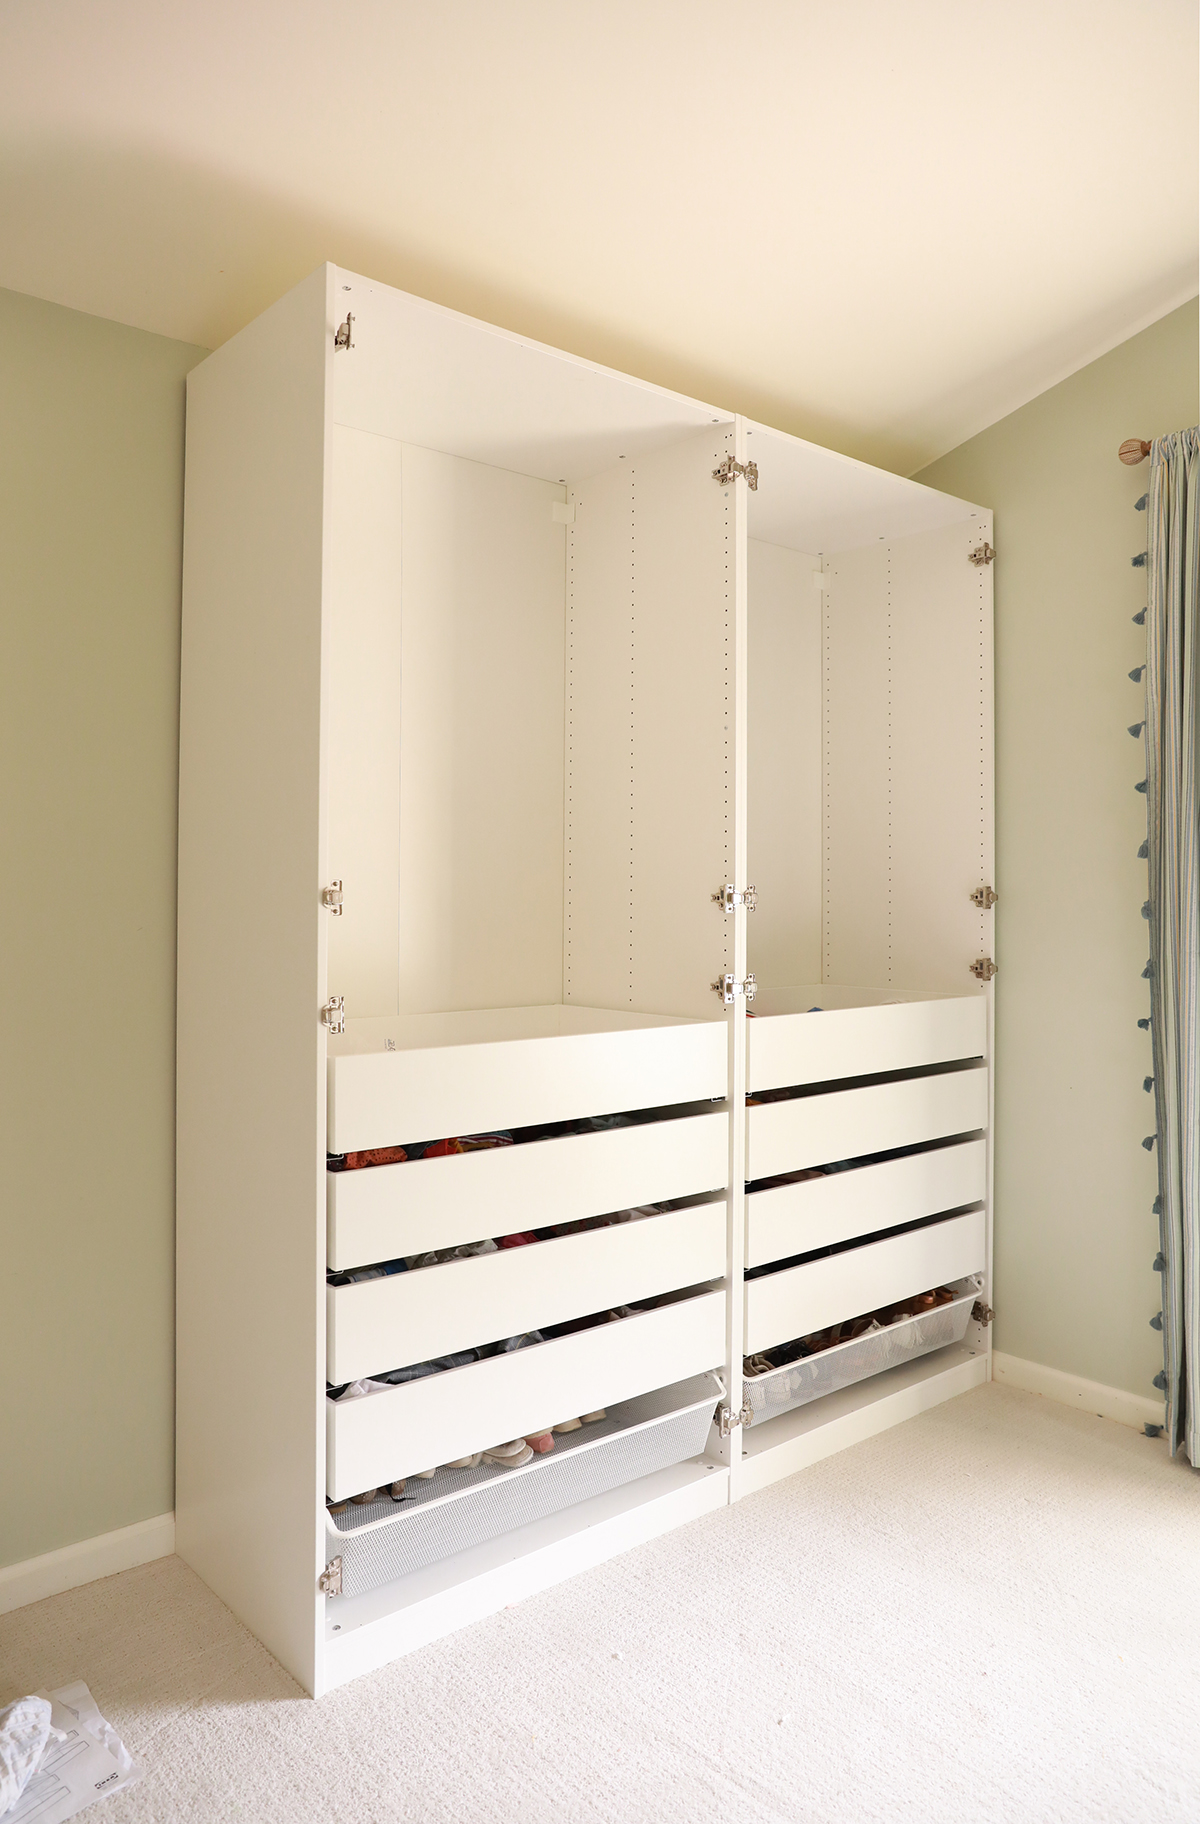
We used the IKEA Pax Planner tool on their website to figure out the inside design and what pieces we needed to order. This is pretty close to what we landed on! I wanted spacious drawers that would fit all 3 girls’ clothes. There have definitely been supply issues this year with IKEA, so I ended up placing three different orders as items became available in stock at the Memphis, TN location. You have to watch the site weekly! Thankfully IKEA ships to our area, and we had these units delivered right to our house.
PAX Wardrobe Cost
(A breakdown of exactly what we ordered)
93 in. PAX units (x2): $270
Drawers (x8): $360
Mesh drawers (x2): $62
Shelves (x4): $80
Clothing rods (x2): $30
Doors (x4): $520
Soft close hinges (4 pack): $100
____________________________
Total cost: $1422
I consider this a decent price for customized wardrobes as big as a closet, BUT it does require a good chunk of time to assemble. If you have Task Rabbit available in your area, you may be able to find someone to assemble the wardrobes for you for a fee that you find well worth it!
Gabe’s take on Assembly of the Ikea Pax Wardrobe Units:
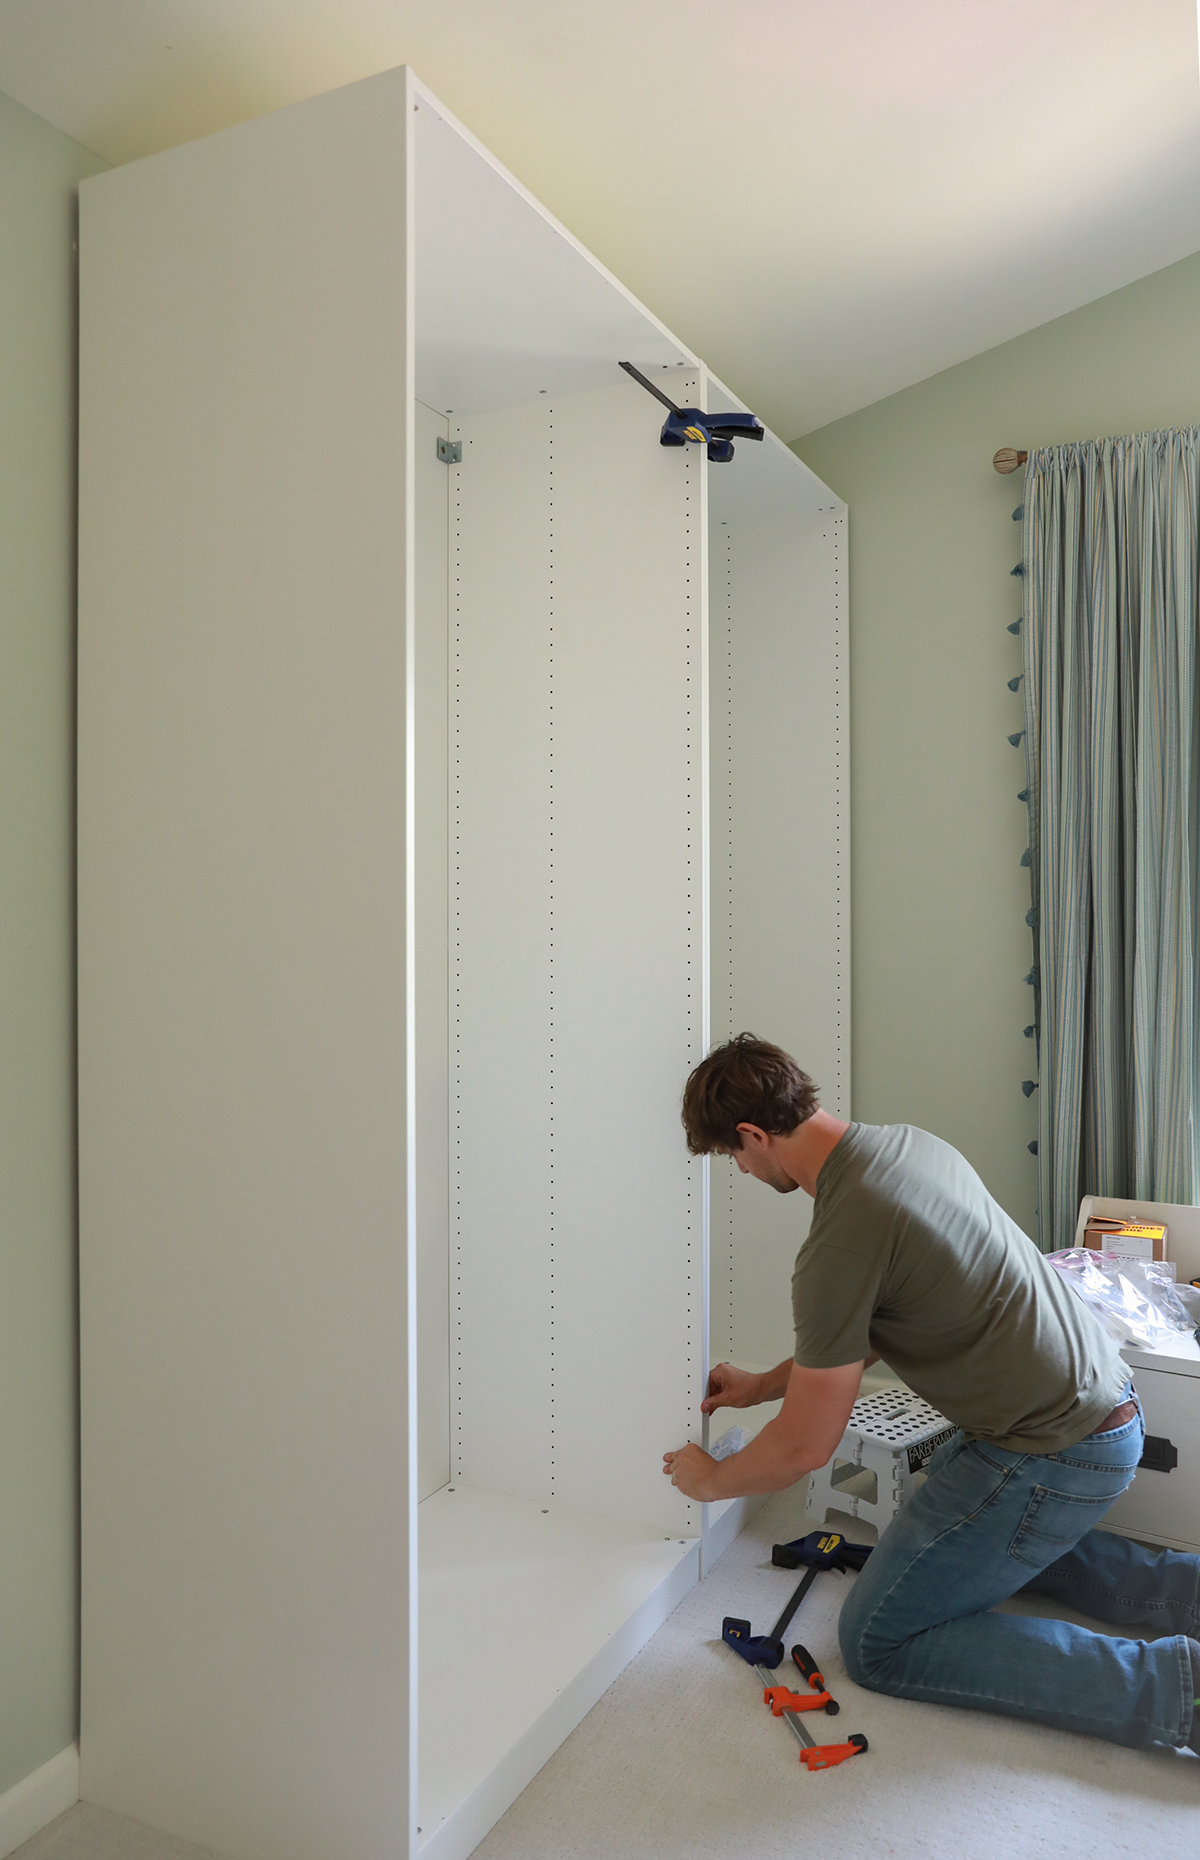
My experience with the Ikea Pax assembly however was fairly straightforward and durable considering past experiences. ( I am not generally a fan of Ikea furniture due to frustrations in assembly, and the quality that doesn’t hold up in a house with 7 kids. )
Assembly tips:
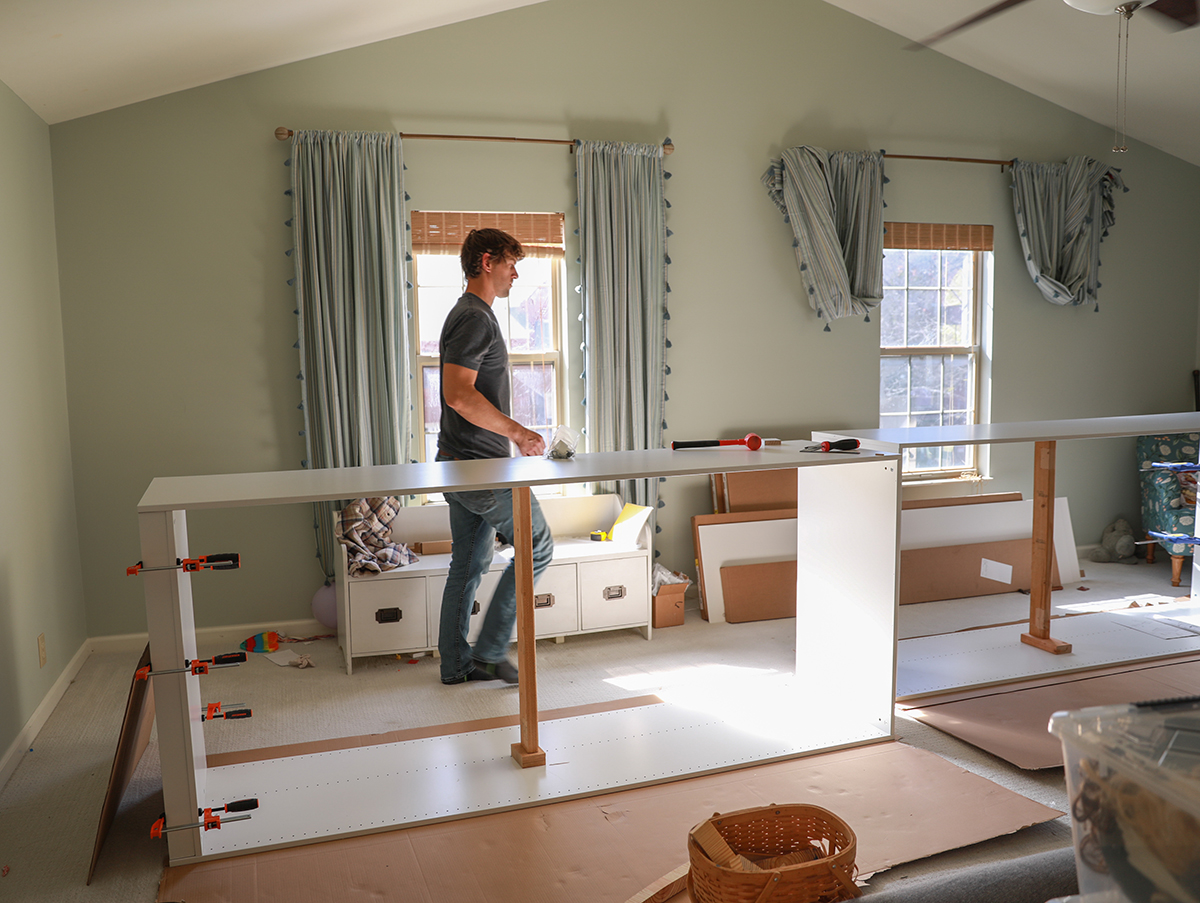
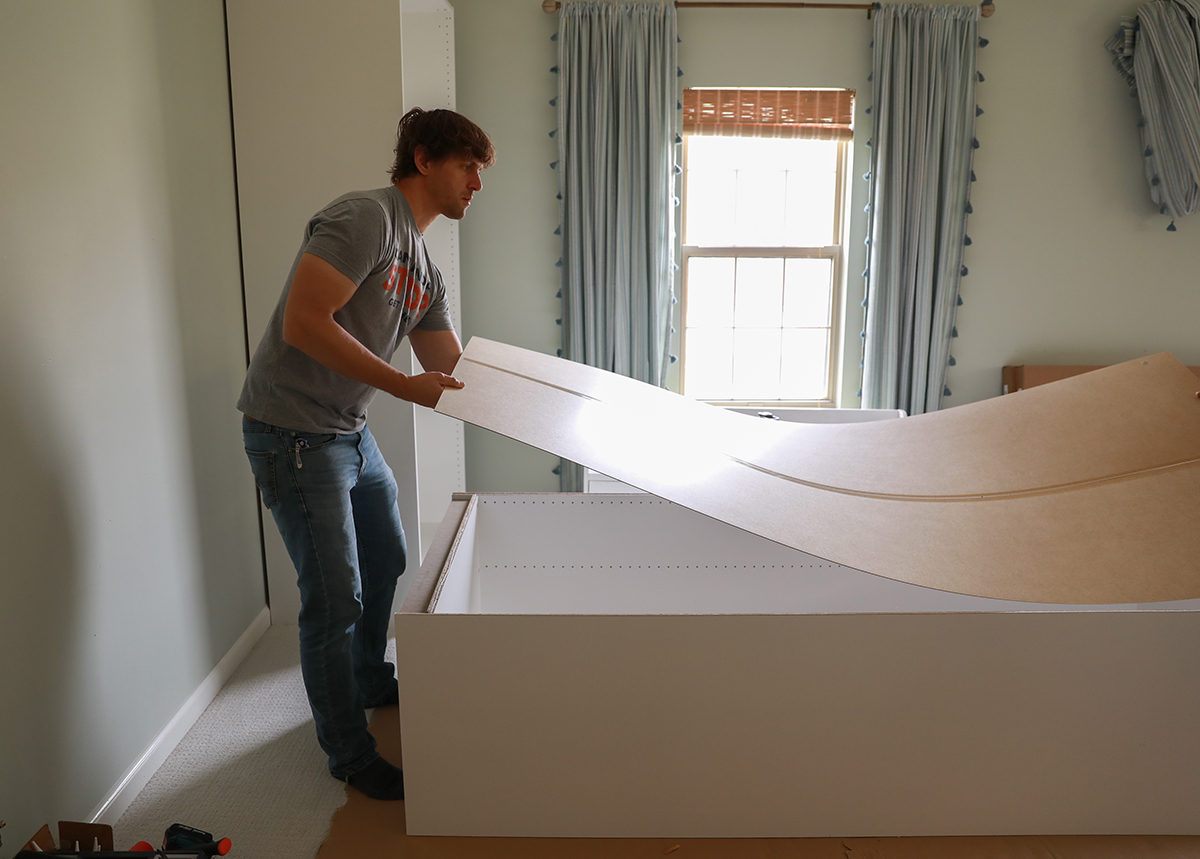
Knowing these wardrobes will likely take more of a beating with 3 girls opening and closing the doors multiple times a day, I took some extra precautions to make sure they would be extra secure. I used some Roo Glue in each fixed joint, as well as clamps to secure and help glue dry. (Ikea joints often do not fit as tightly together as I would like, so adding the right glue to the joint can provide a bit more stability.) I would also note that having an extra pair of hands can be very helpful due to the length of the side walls. When my dad was visiting, I roped him into helping me assemble. Trying to do these solo is possible, but having someone give periodic assistance will save a lot of time.
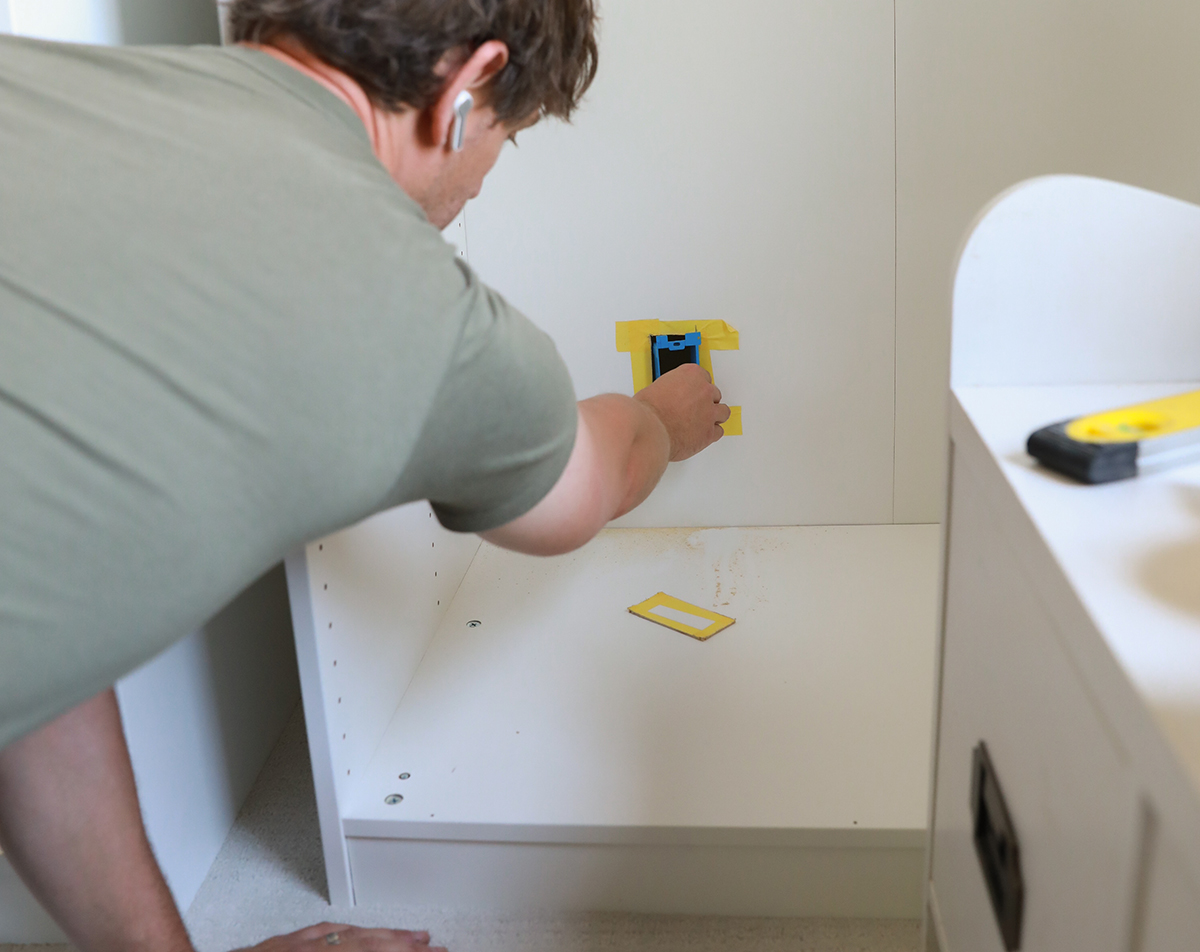
Electrical Box
Once assembled and in place, I cut a hole a wall outlet that would have otherwise been blocked. After the units were secured I used electrical box extensions to properly set the outlet at the back of the unit ensuring that it is properly up to code.
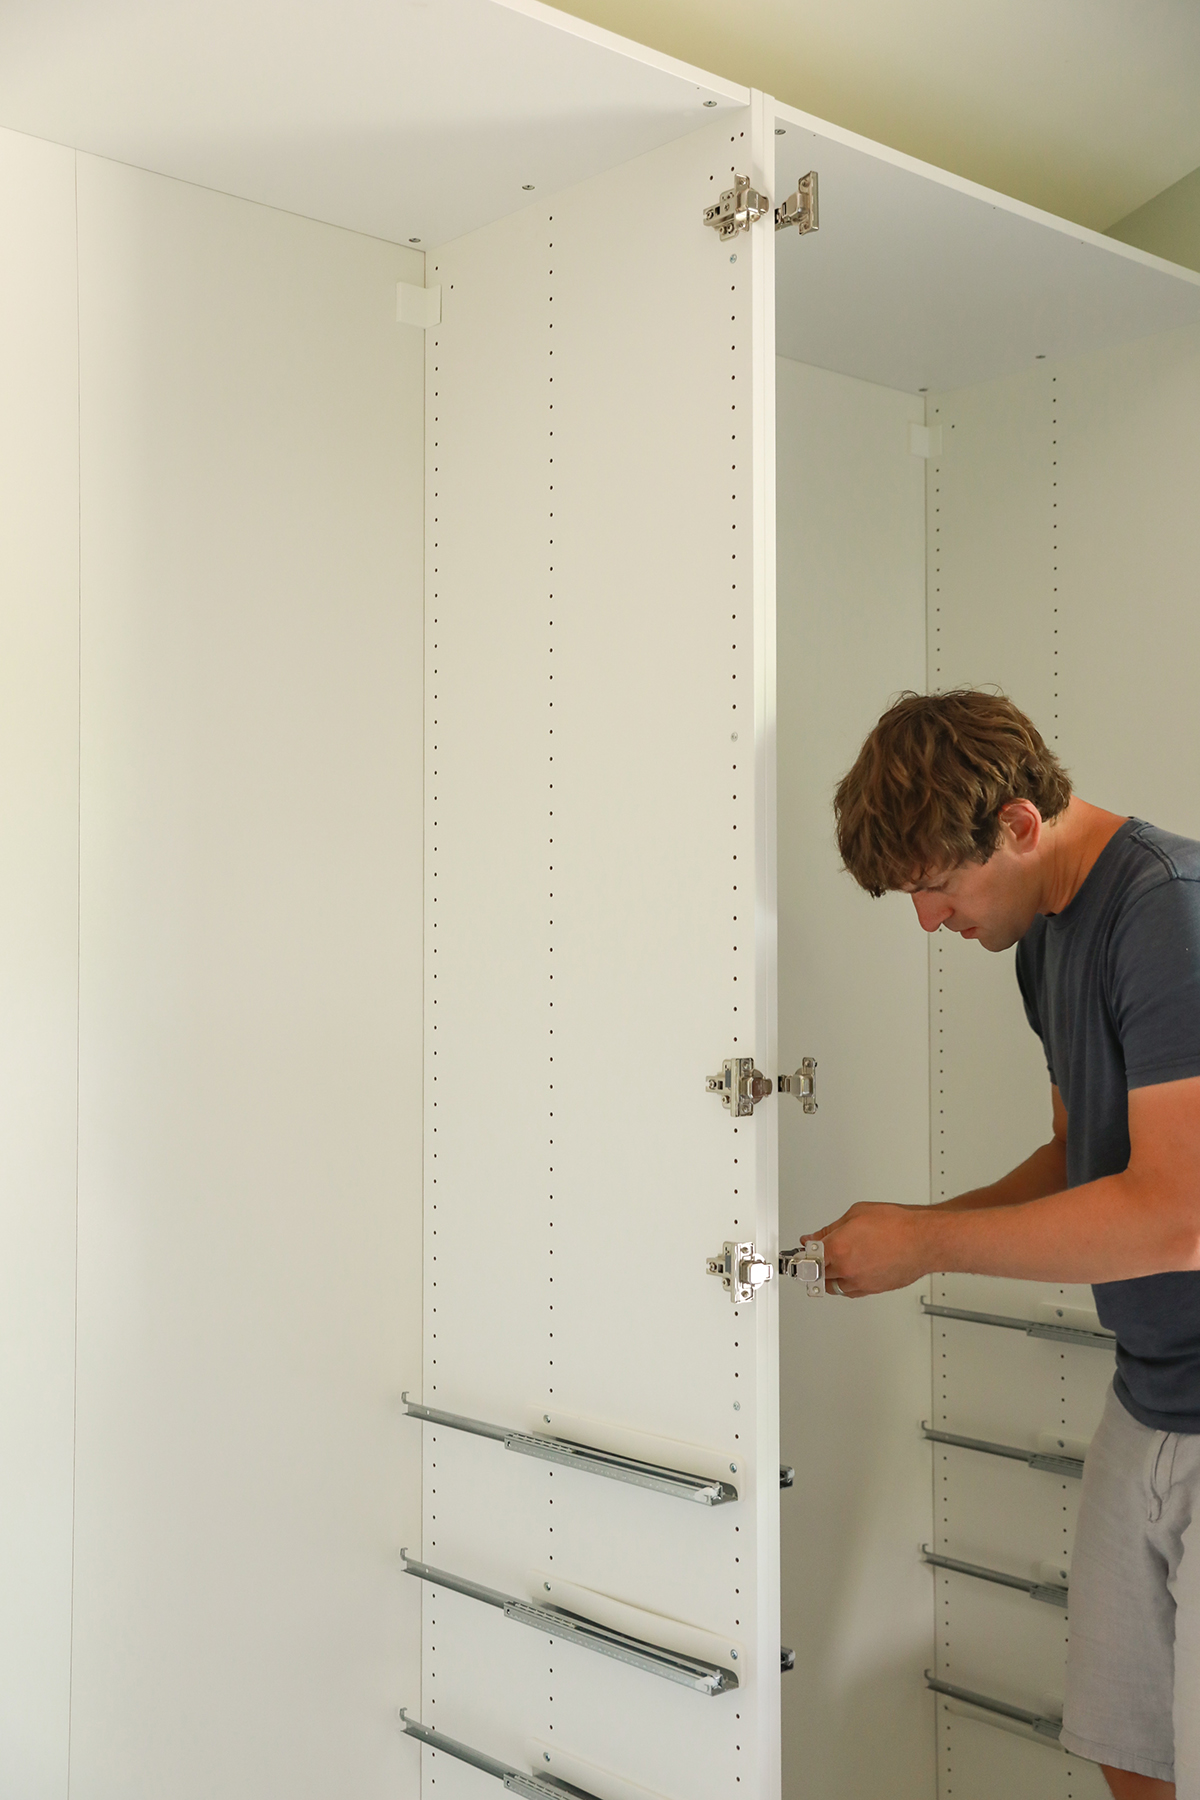
If you order drawers and hardware with your IKEA Pax units, the instructions are also pretty straightforward and easy to assemble once you get one under your belt.
PAINT PREP STEPS
1. After the wardrobe boxes were assembled and secured in place, we prepped the doors and bottom trim for paint. When painting Ikea furniture, preparation of the surface is the key to a good outcome.
2) The second step to a good paint job is having a clean environment to paint in. I recently started setting up a temporary spray booth in the garage by using some cheap plastic sheeting and 4 Zip Wall poles. This allows me to paint in a low dust environment, and has greatly improved my finish painting for doors and furniture. Although doing so it not necessary, I highly recommend doing so if you paint semi regularly and are a perfectionist like me.
3) Start your surface prep by gently sanding all surfaces that will be painted. Gently hand sand with 220 or 300 grit sandpaper. The objective of this preliminary sand is to lightly scuff the surface as it allows your paint to adhere much better to Ikea furniture. Do not use a power sander as it will likely damage your work surface.
4) After scuffing, vacuum off all dust with a soft vacuum head attachment, then wipe down with tack cloth to remove any remaining fine dust particles.
PAINTING
Supplies used for painting:
Zinsser BIN Shellac Based Primer
Graco 360 VSP paint sprayer
Plastic sheeting
4 Zip Wall poles
Prime your surface by adding a high quality primer paint. I prefer to use an oil based primer when painting Ikea items, as a water based primer has not always properly adhered to the Ikea paint. My go to is Zinsser BIN Shellac Based Primer for a few reasons: it has great adhesion, it levels out very well once applied, sprays and rolls on well, and it sands out well once dried. It is a high quality oil based primer and it does smell a bit, so use it in a well ventilated area. I sprayed the primer on doors using our Graco 360 VSP paint sprayer with the sprayer’s pressure set to about 8.5. Two coats of primer are recommended followed by a gentle hand sand with 220 or 300 grit sandpaper after each coat has dried. This sanding helps to level out any paint blemishes that may have formed during the priming process. Then I cleaned the surfaces with a vacuum and tack cloth as mentioned above.
The final step is to apply your paint coats!. I like to use Benjamin Moore Advance in a satin finish. This is one of my favorite hard wearing water based enamel paints to use on doors, trim, and furniture. It sprays very well, levels and tightens well (especially if sprayed or rolled with a quality fine finish roller pad), and produces a hard durable finish. I sprayed this on the doors using the Graco 360 VSP and had very good results. No need to sand between coats unless you find a blemish that needs to be gently smoothed out.
Quick tip, if you find the sides of the doors are developing slight runs after painting, roll the sides with a high density foam roller pad with a very light pressure about 3-5 min after applying the paint coat.
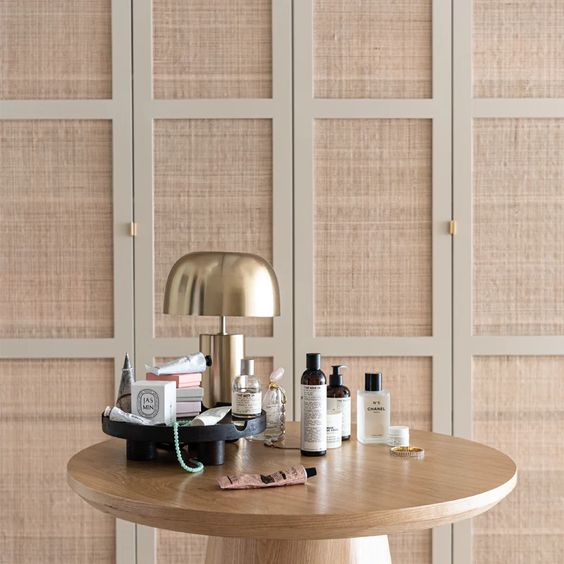
(Inspiration for the project)
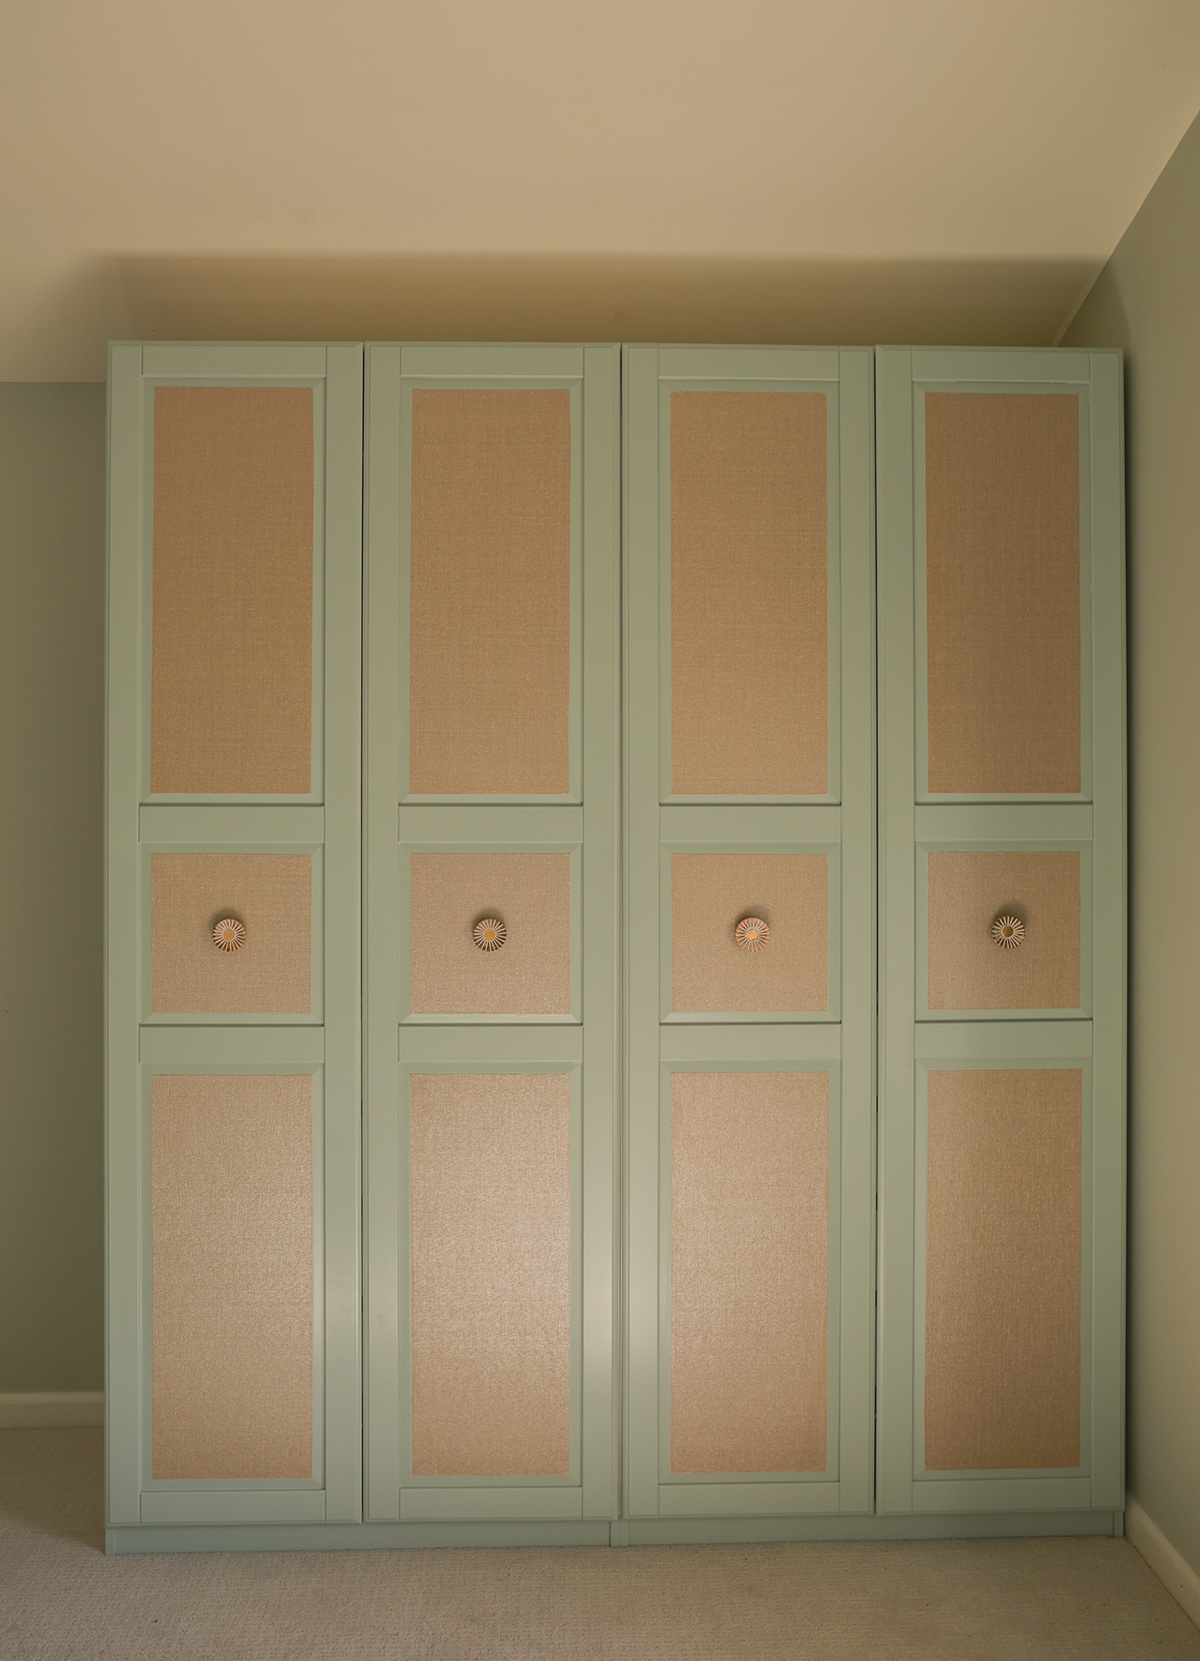
Anna’s take on customizing the door fronts:
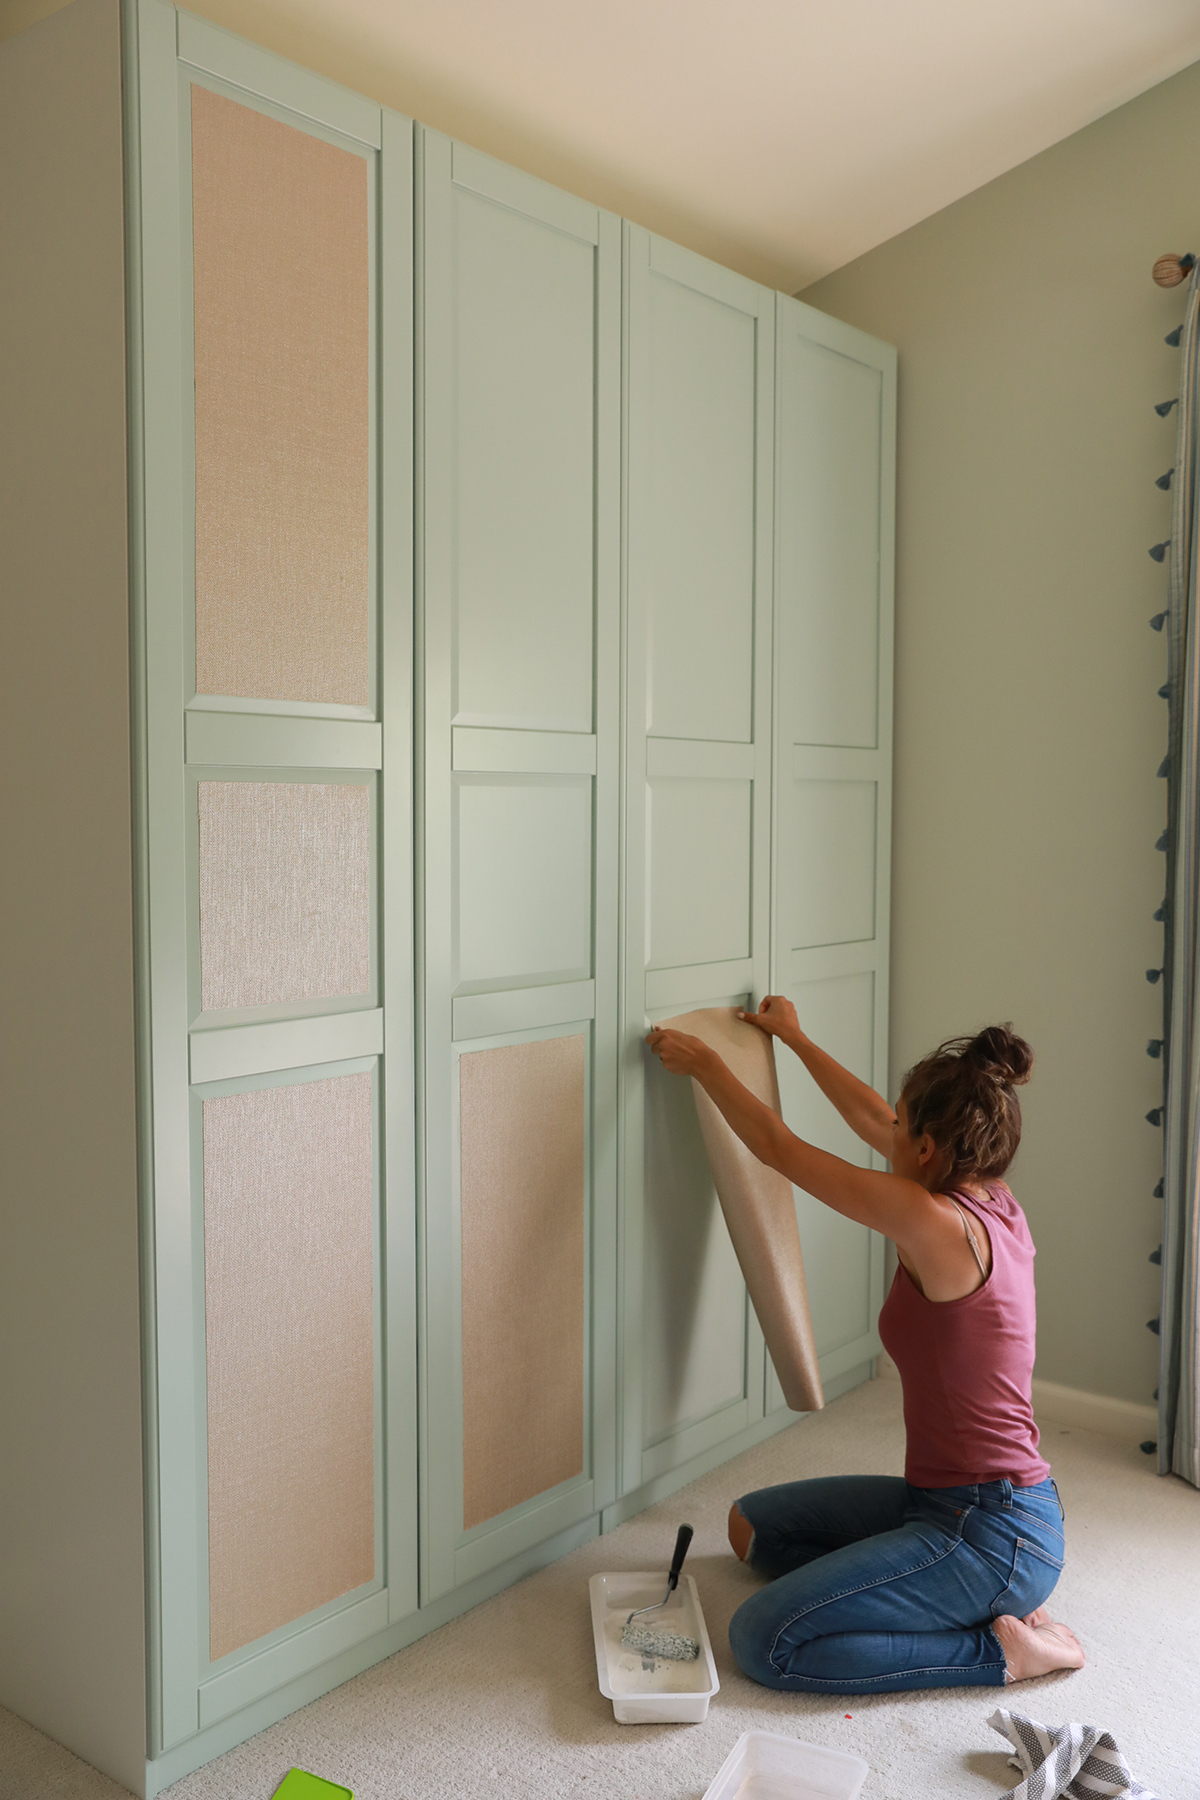
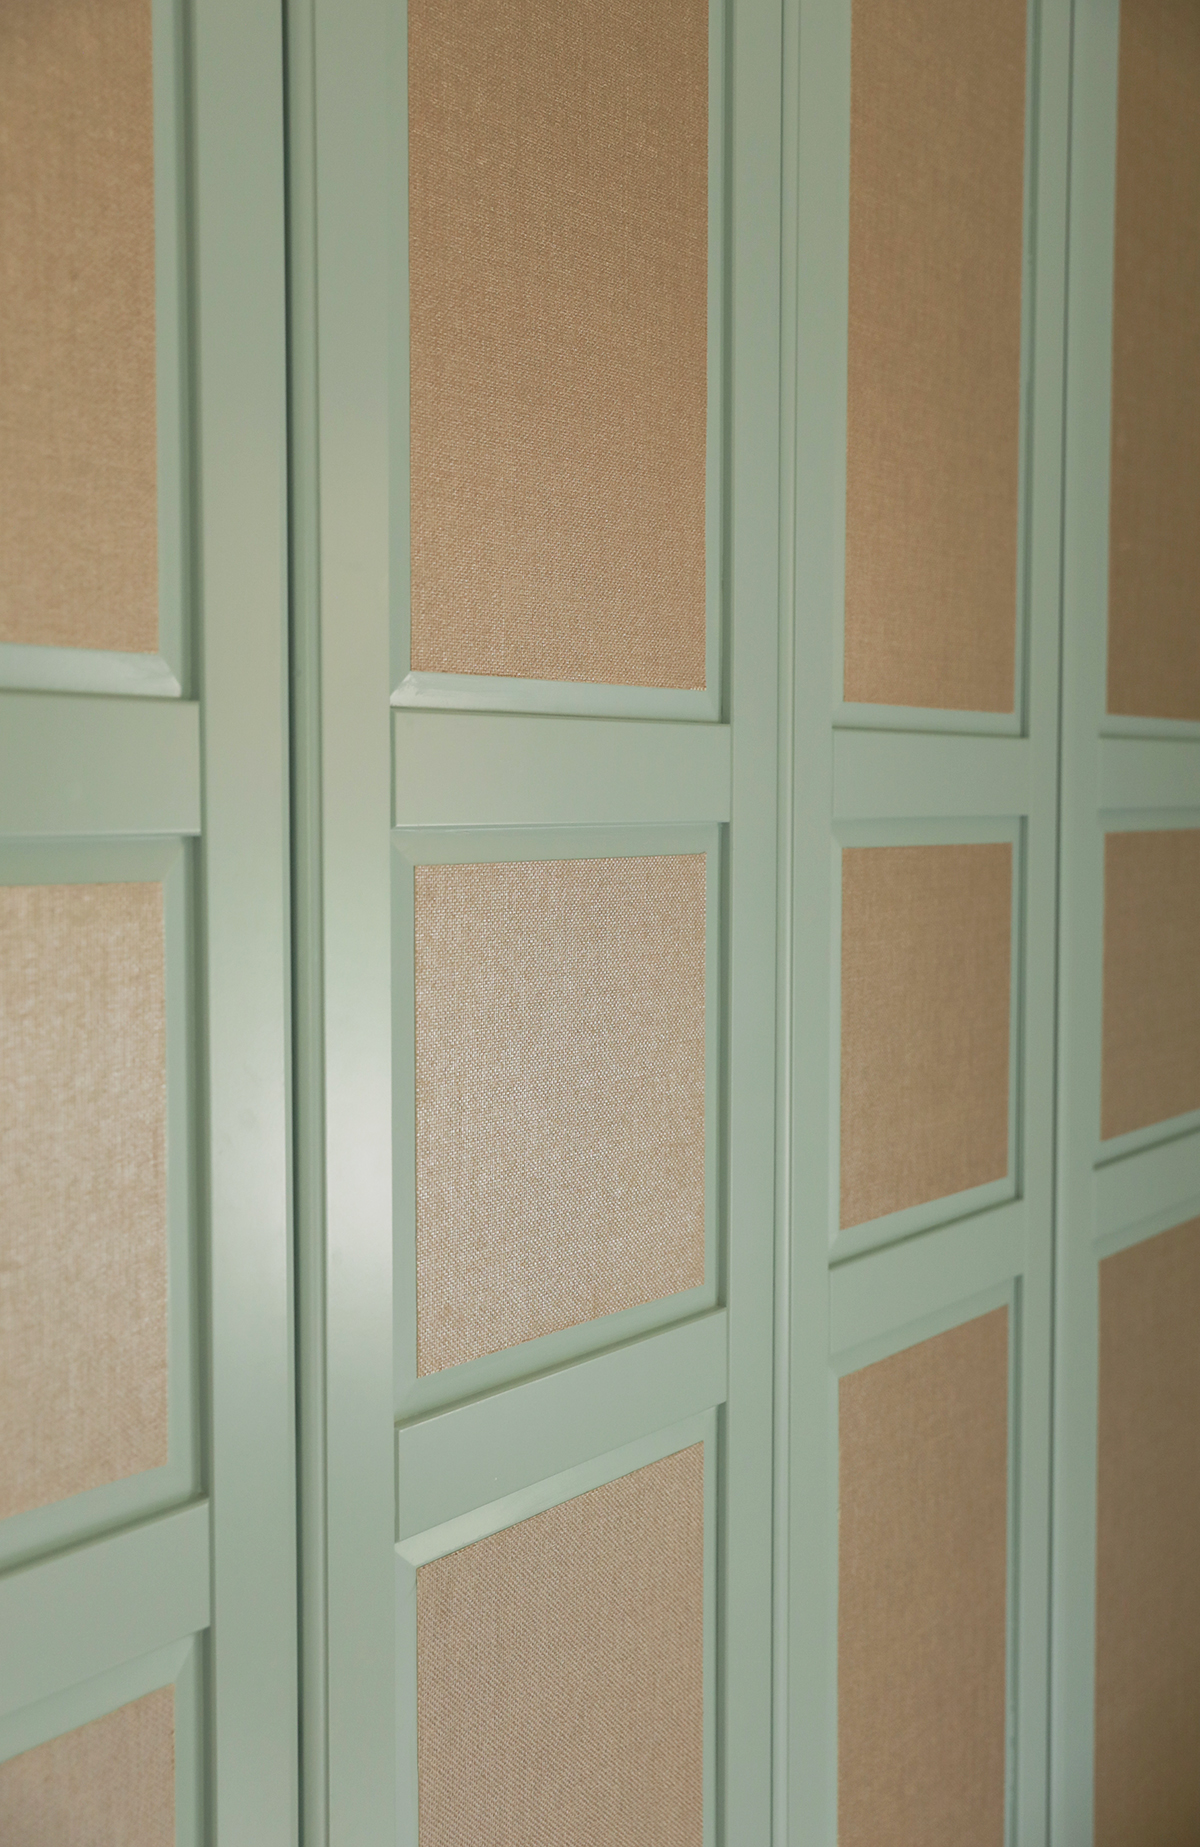
CUSTOMIZING IKEA DOOR FRONTS WITH WALLPAPER
I absolutely love the custom doors Fronteriors creates for IKEA wardrobes, and they use actual caning. Since these doorw were out of budget for us, it did get me thinking about alternative ways to create a more custom look with some texture, character, and color variation. Grasscloth wallpaper came to mind, but I wasn’t sure how it would adhere to the doors. Thankfully, this was a project (for once) that actually was easier to execute than I anticipated!
Supplies used for wallpapering:
Wallpaper Glue
Smoothing Tool
Wallpaper or Removable wallpaper (This is the exact textured wallpaper I used.)
Utility Knife
Cloth and warm water
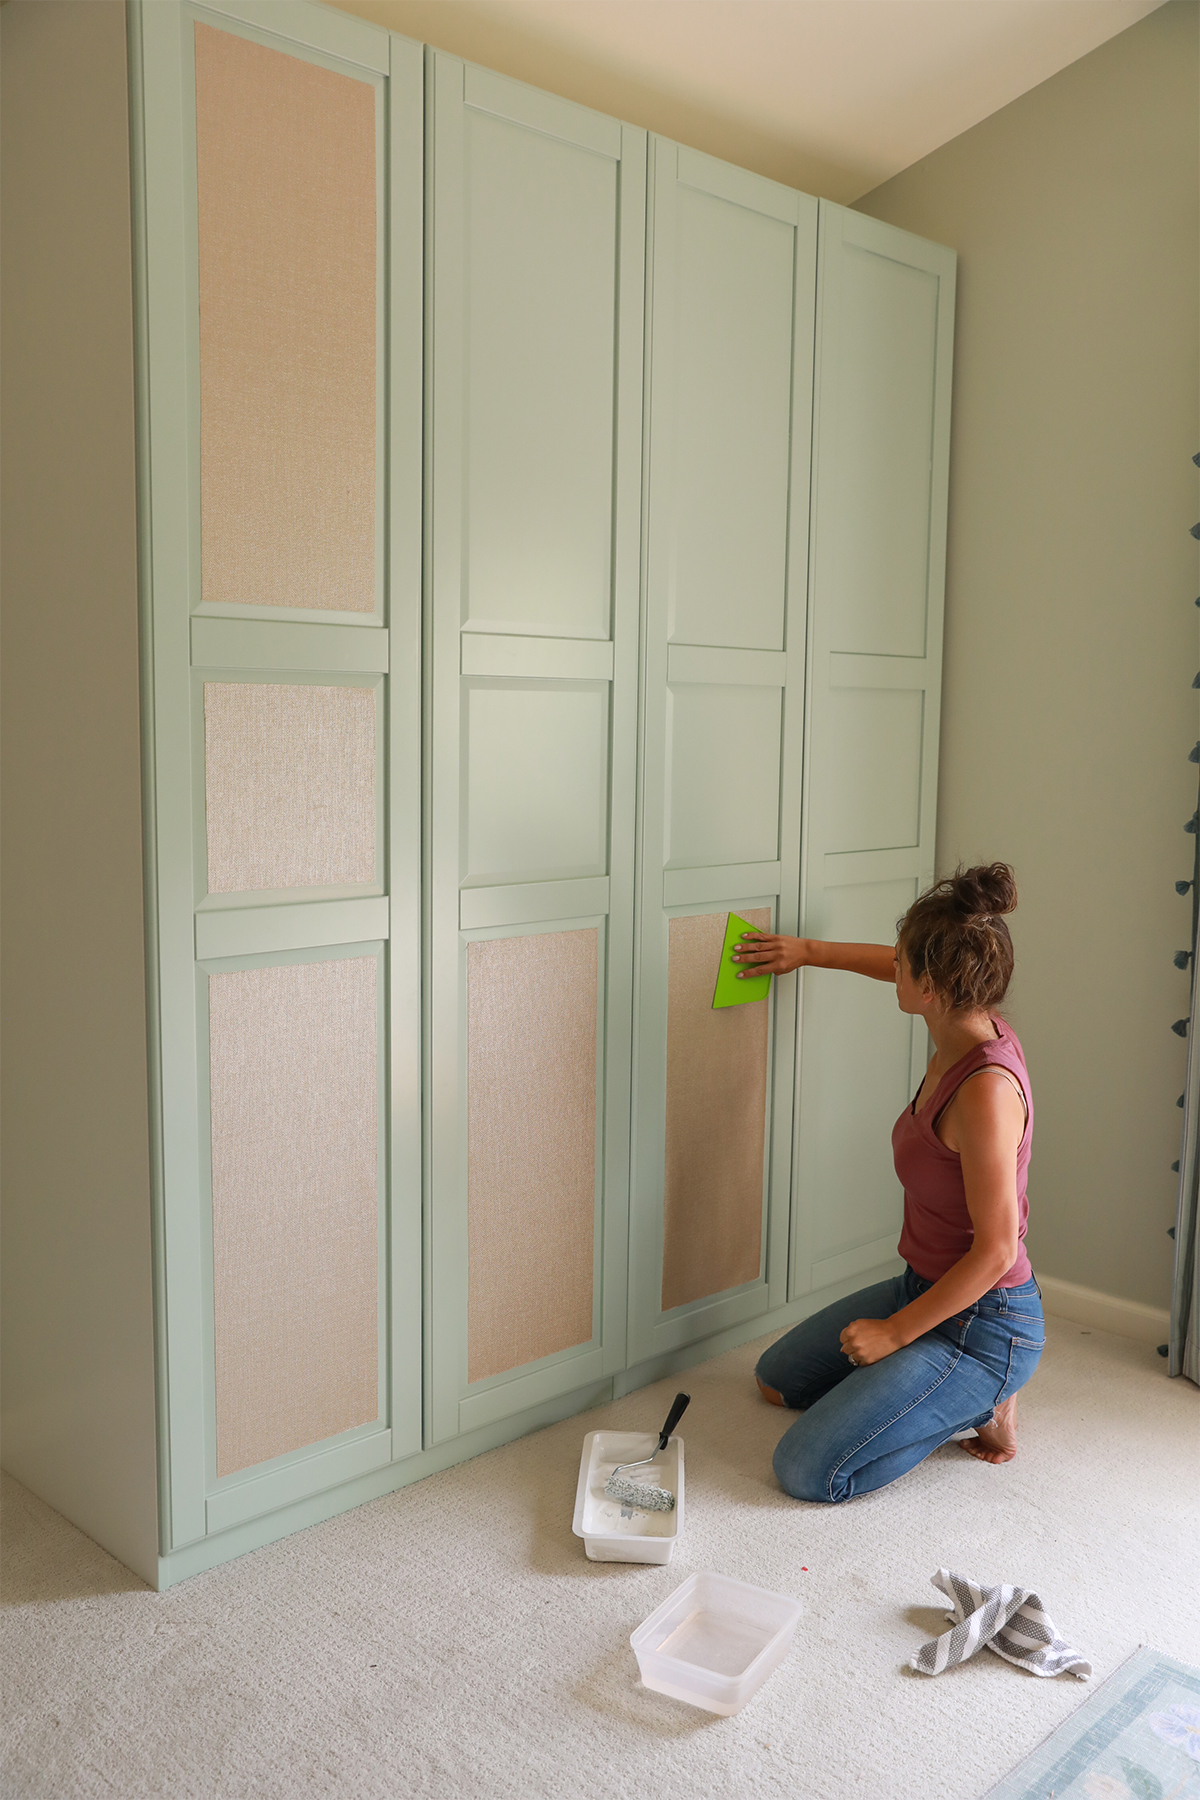
This would have been ideal with the Flisberget, Bergsbo, or Grimo doors that are not beveled and would allow the wallpaper to reach full width of the frame. (Wallpapering beveled edges is a beast.) They only had the Tyssedal doors in stock in our area though so I knew the finished look would have a more floating edge effect.
Steps for wallpapering with standard wallpaper:
1) Pre-measure and cut the wallpaper panels needed to apply to your door fronts. I used a wooden plywood board, utility knife, and a yard stick ruler to measure and make cuts.
Tip: Most wallpaper will have at least one side that is cut as a straight edge. Finding that side first will help with alignment of the rest of your cuts.
2) Apply wallpaper glue to your surface. Pour wallpaper glue into a small paint tray. Use a mini paint roller to soak up glue in even amounts around the roller. Roll onto your surface for an even coat of glue. Too thin of a coat will not allow you wallpaper to stick around the edges. Even coats do best, and adding a little extra around the edges may be needed. (I had to use my finer a few times to add more glue on the edges of this particular wallpaper so the corners and edges wouldn’t curl up.)
3) Apply your wallpaper. Align your cuts corner to corner and start to work your way down using the smoothing tool. You can up excess glue with a rag and warm water. Make sure you smooth out any air bubbles that may occur. As the wallpaper dries keep your eye on those edges to make sure they stick well!
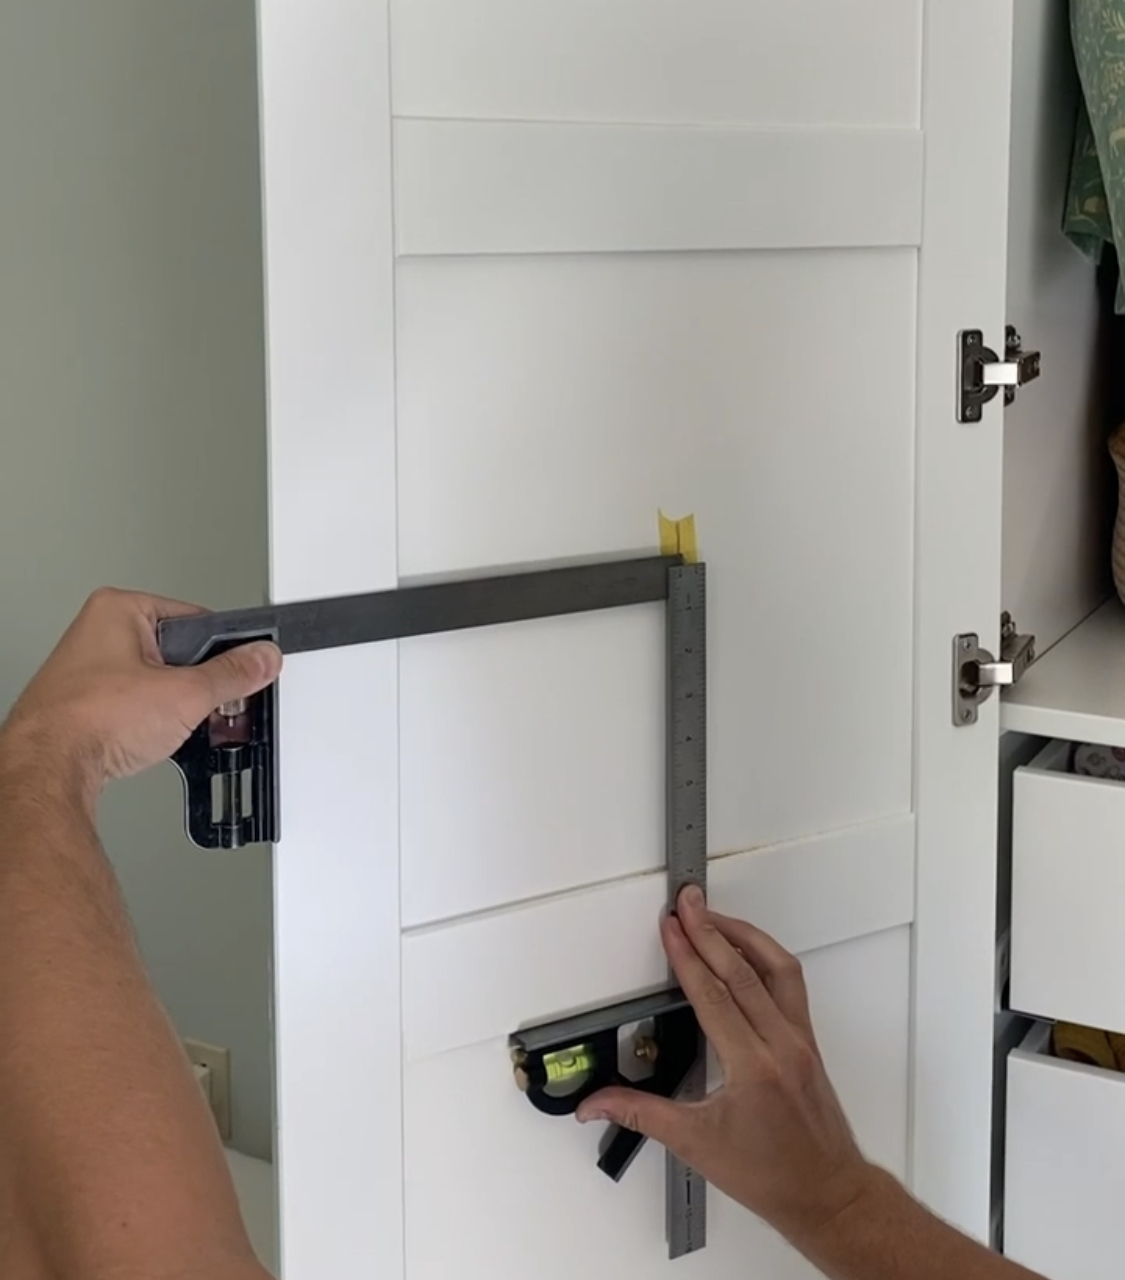
INSTALLING KNOBS OR PULLS (GABE)
Supplies Used:
Frogtape
combination squares
1/8th drill bit
Daisy knobs
Installation of the knobs was very easy. I like to used delicate surface Frogtape placed near the center of the panel where I estimated the knobs would be installed. I then used combination squares to find the center of the panel and marked the location on the tape. Because MDF can sometimes be delicate when drilled or cut, I drilled a preliminary hole with 1/8th drill bit as a pilot hole. I then changed to a larger bit to accommodate the diameter of the knob screws, and finished the knob install with my ratcheting screwdriver. Because of the thickness of the Ikea doors, the screws for the knob pulls may be too long. If this is the case shorter screws may be needed. I found 3/4 in screws at my local hardware store that fit the knobs and the door thickness perfectly.
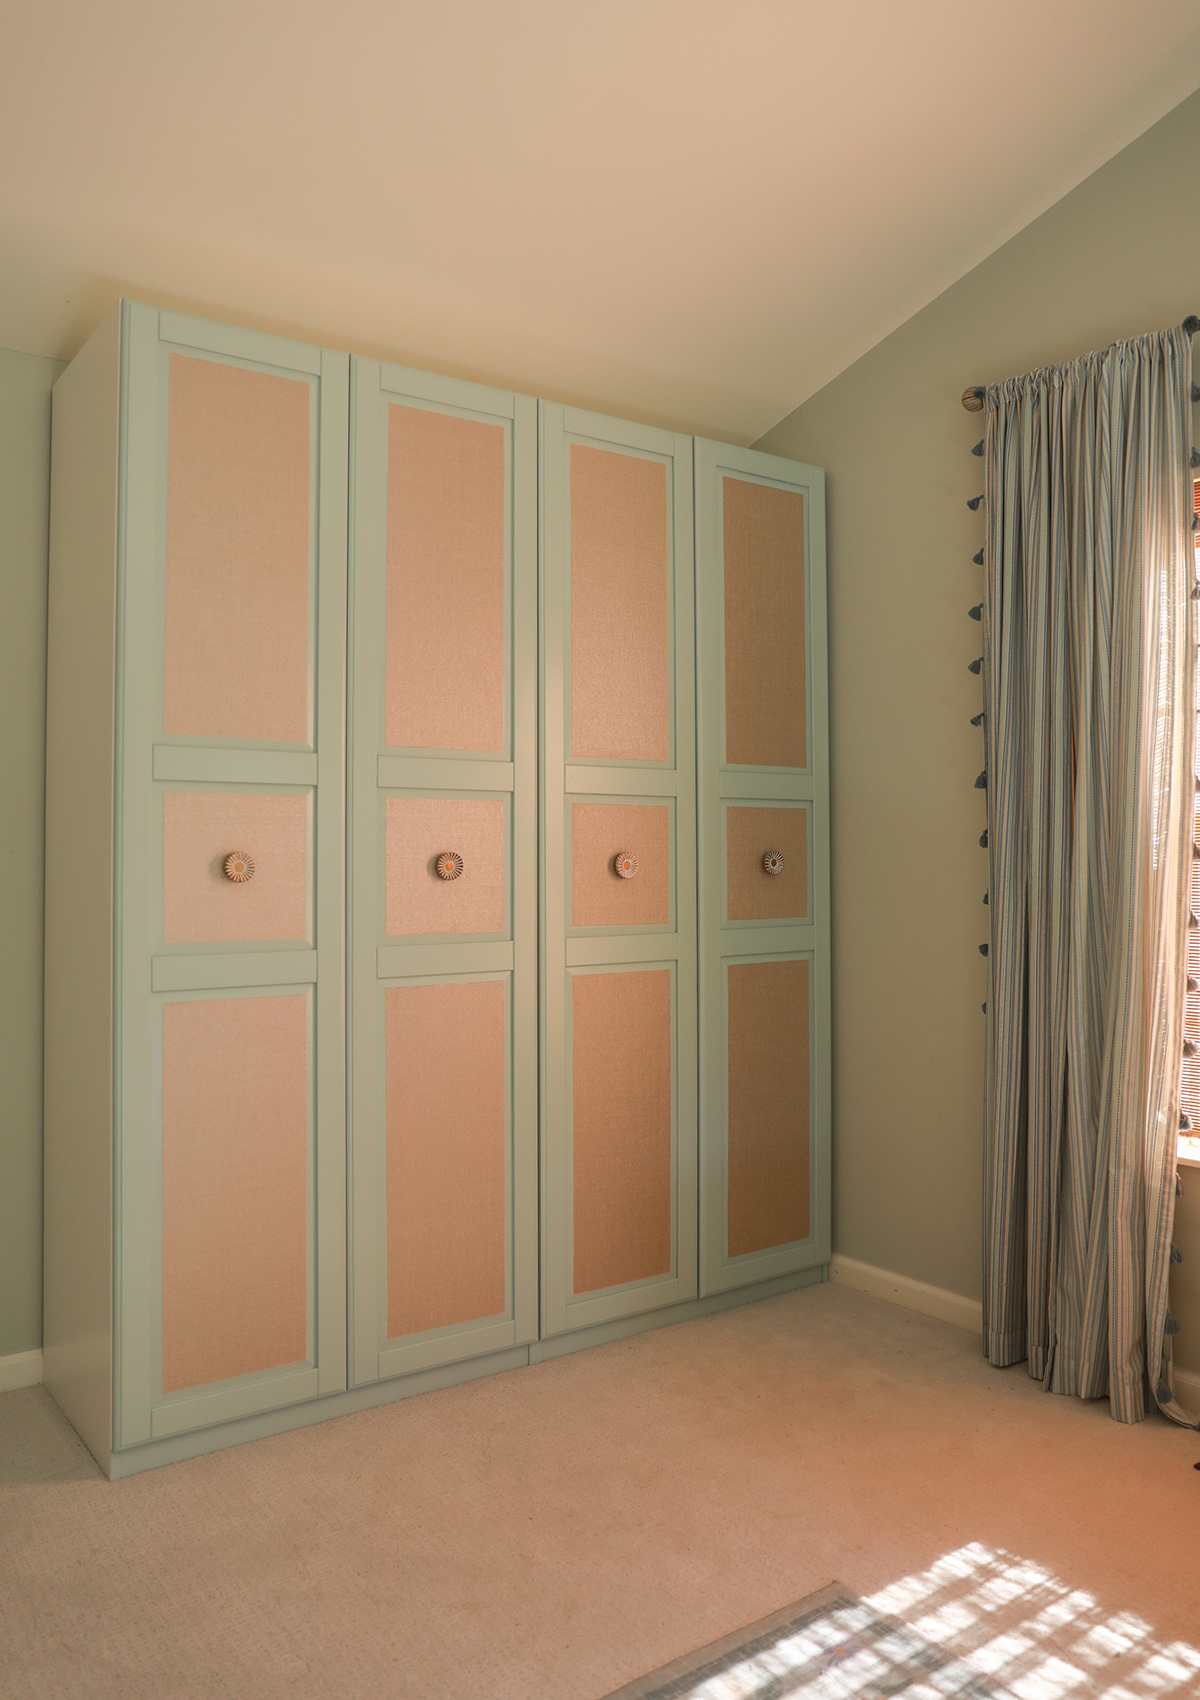
Anna: I originally thought I would use handles on the sides, but when I saw these hand crafted wood daisy knobs, I knew I had to adjust my plan. They are pretty large, so I knew if we installed in the center of the door it would be easy for the girls to pull. I LOVE the look of centered knobs, and definitely felt like a better fit for this overall design.
My one regret with this project was not testing the paint on the IKEA unit before spraying. I broke my own rule due to time constraints, and yet again was proven wrong that I cannot eyeball it. The color looked like a shade darker from the wall when I tested the wall swatch, but after applying it seemed more blue than green. It works though, and I am okay with it. Being an admitted color perfectionist, I will always wish I had taken the time to test!
I really love the outcome, and I am so glad I went for it. However, a reminder that these types of projects are something we truly love to do, and it is part of our job to document and share design work. If this is something you also love, I would encourage you to give it a try and put your own spin on it! If time and supplies are a constraint, this is a beautiful wardrobe you can leave as is too! Please let us know if you have any questions in the comments below.


