Walk-in Pantry Design

March 22, 2018

In case you missed the first pantry plan post, here is a quick re-cap! When we first moved into this home we knew we would have to figure out alternative pantry space. Our tiny pantry for a family wasn’t quite doing the job for our big family. We set up some temporary storage in the garage, but we realized our laundry room right off the kitchen would actually be the perfect walk in pantry size. Here are all of the before and after photos of our walk-in pantry design, as well as a little more about the process! Don’t worry, we still have a laundry room! We finished a space in the basement for that.

The first step to prepping this space was to haul out the washer and dryer and cover up all the outlets that we didn’t need. Gabe patched the walls where needed, and painted the room Moderne White by Behr since we already had that on hand! We researched options for shelving, and found the materials we needed to do our own built-ins. 

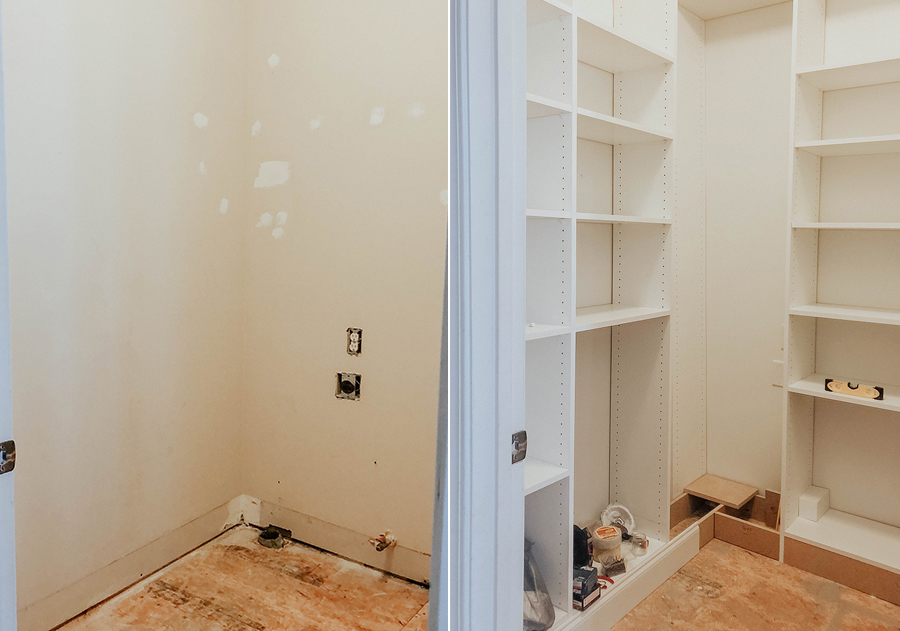
If you plan on doing built-ins yourself, we highly recommend adjustable shelves so that you can create the height between shelves you need. This did require a good deal of extra time since Gabe drilled through all of the pre-drilled holes to make sure we could insert shelving tabs on both sides. (They only come half way drilled through.) It was worth the extra time however, since we have so much more flexibility with the structure now.

A little bit about the specs:
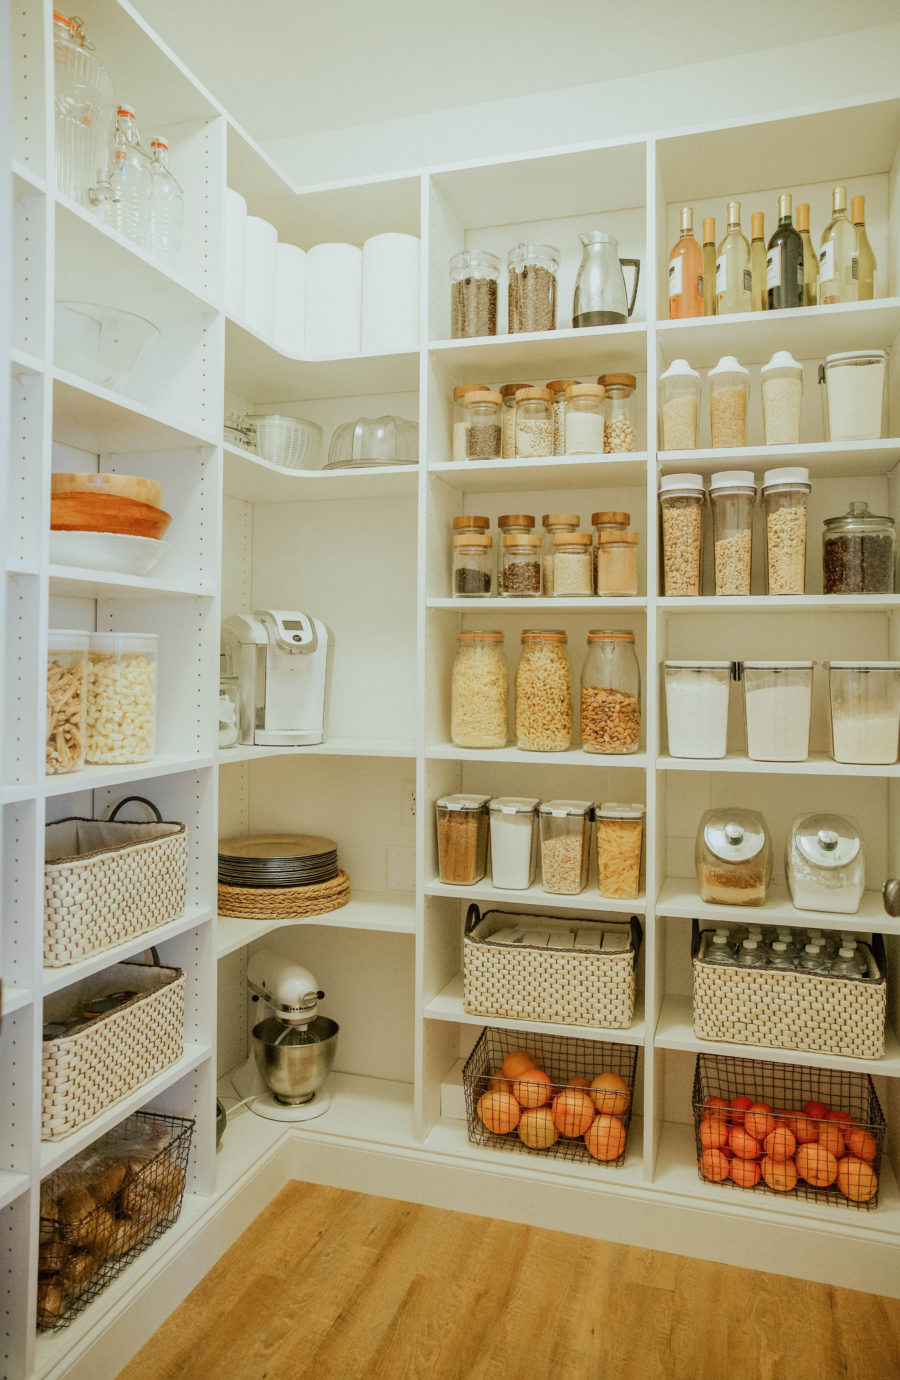
– We decided to use ¾ in thick and 11¾ in. deep melamine boards to construct the pantry. The vertical lengths are 8 ft. pre-drilled boards, while the shelves and top are un-drilled boards cut to length.
– All shelves except for the corner shelves are 20 in. in length. The corner is constructed from 30 in. corner shelves trimmed to size.
– The unit is secured together using 1¼in coarse pocket screws, 1½ coarse  screws, 2 in. coarse screws, and a few corner brackets.
– Once the unit was fully built, we finished the floor with heritage plank flooring, which was left over from the basement, and added 5¼in baseboards. This project took about a month’s worth of  weekdays from start to finish!

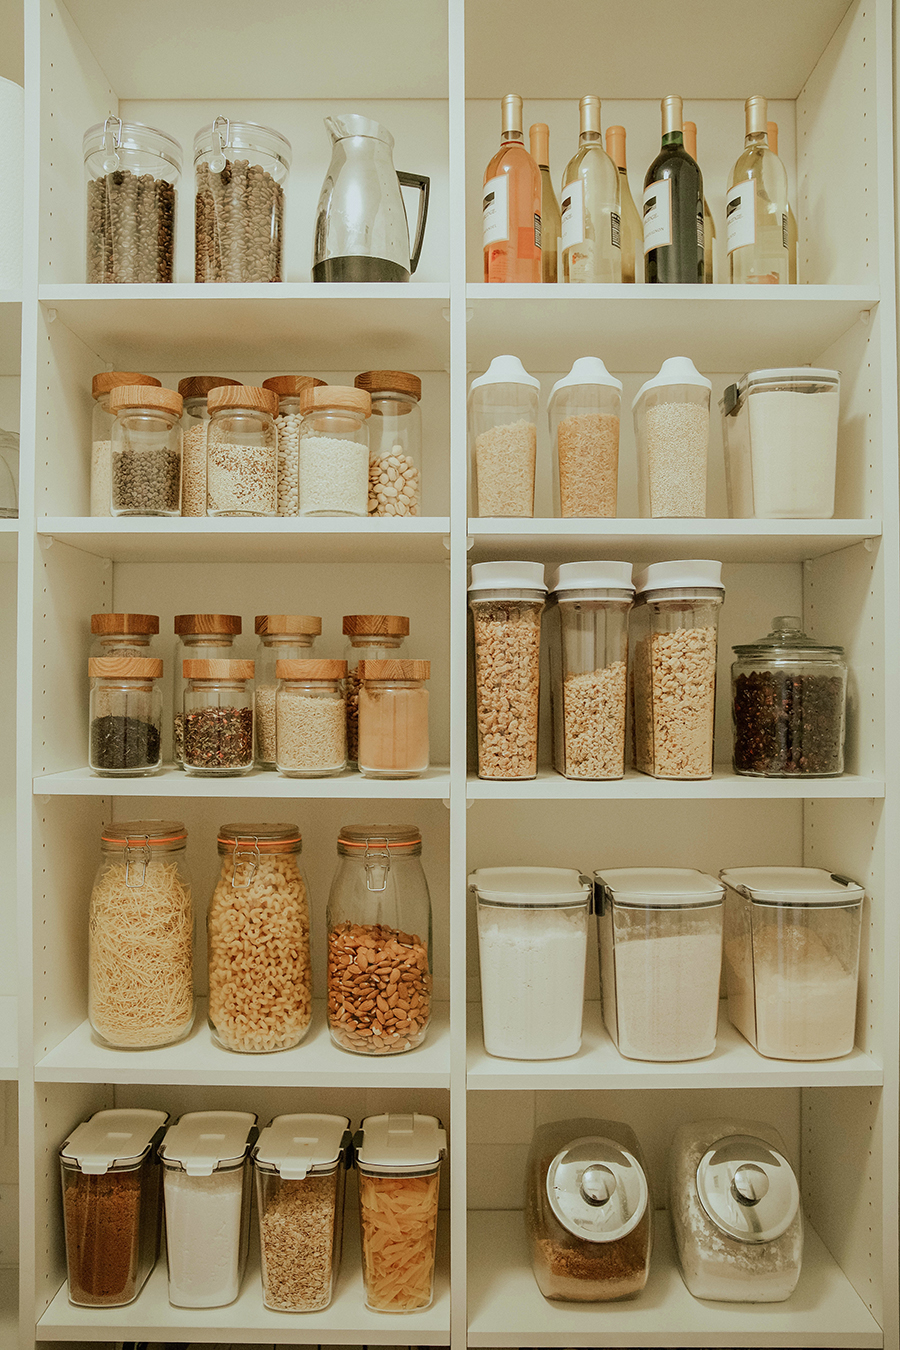
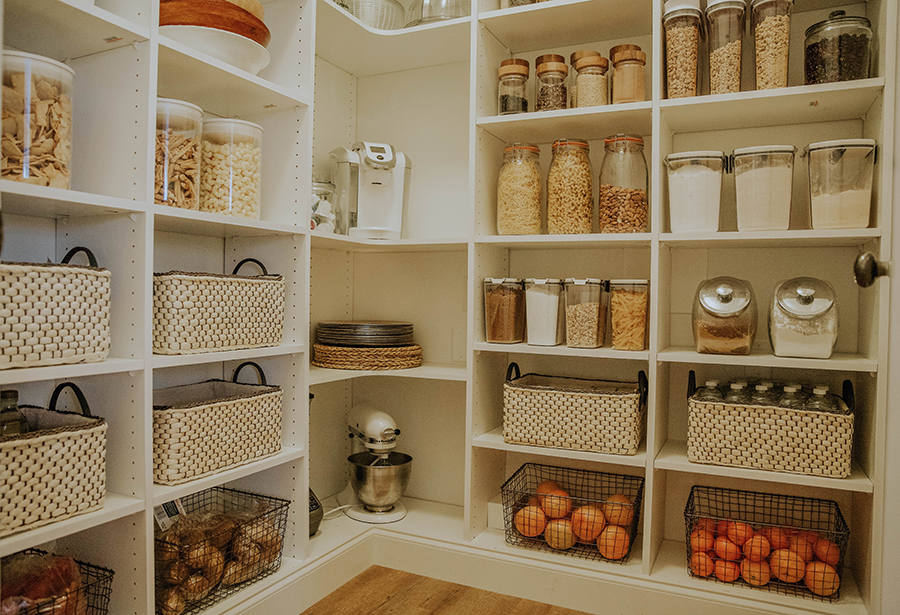
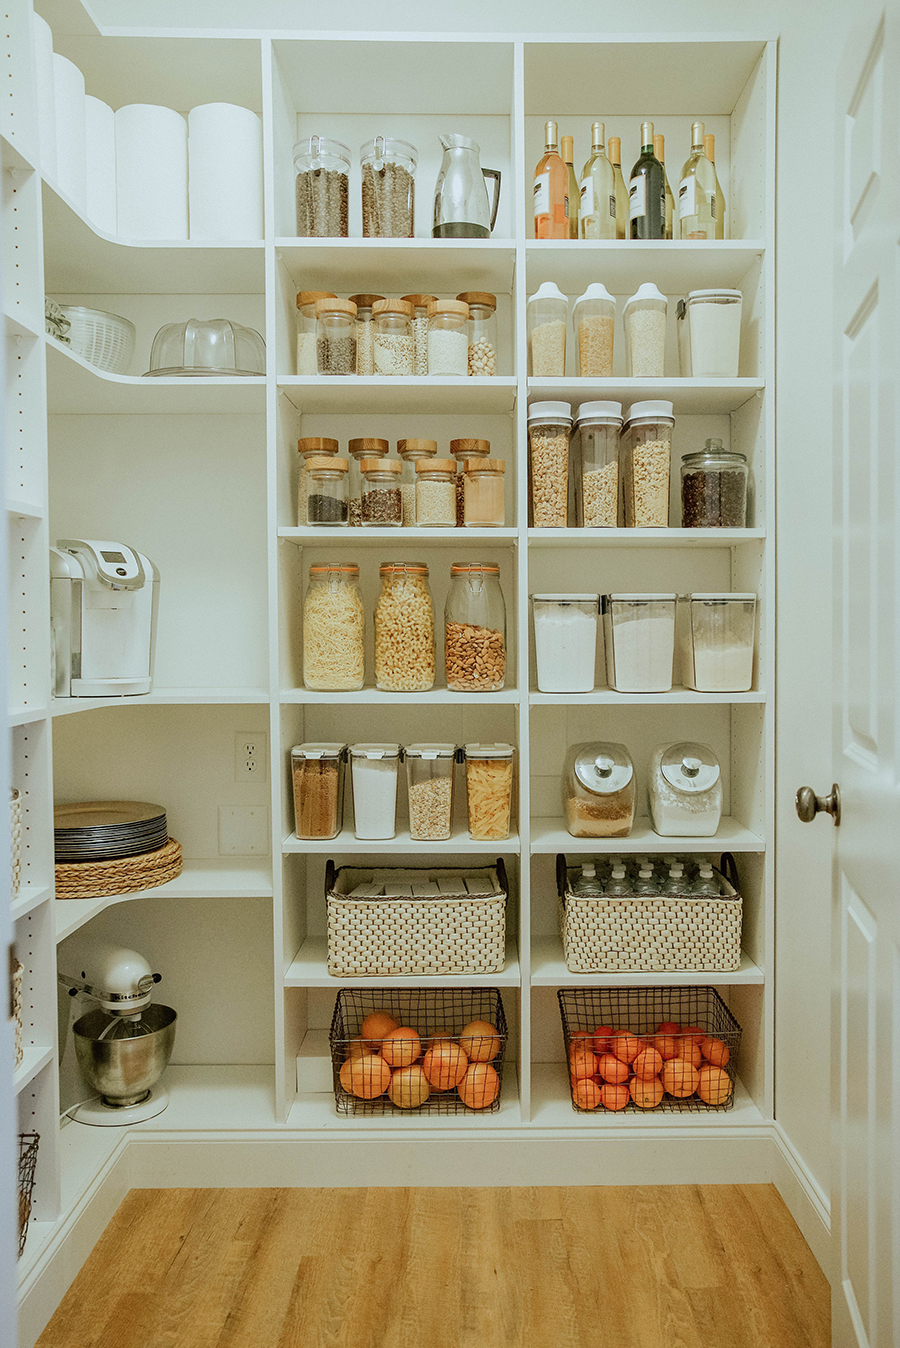
Probably the most gratifying project I have ever worked on was going through our pantry and organizing all of the half used bags of rice and flour. I apparently always think I am out of rice, and hoard it as if there was a pending snowstorm. I went to The Container Store, and found a bunch of really good options for organizing the food stock for our pantry shelves. The baskets were a great option to hold all of the loose items, snack foods, and water bottles. I had to make sure to keep all glass jars high out of reach from curious toddlers;) Here is a list of items we used as pictured:

Similar Hermitage Glass Jars (3 ltr.)
Glass Jars with Oak Lids
Prokeeper Flour and Sugar Containers
Cereal Dispensers
Acrylic Canisters (Used for coffee)
Slide and Pour Dispensers (used for rice)
Click Clack snack canisters
Rustic Wire Storage Baskets
Woven Storage Baskets

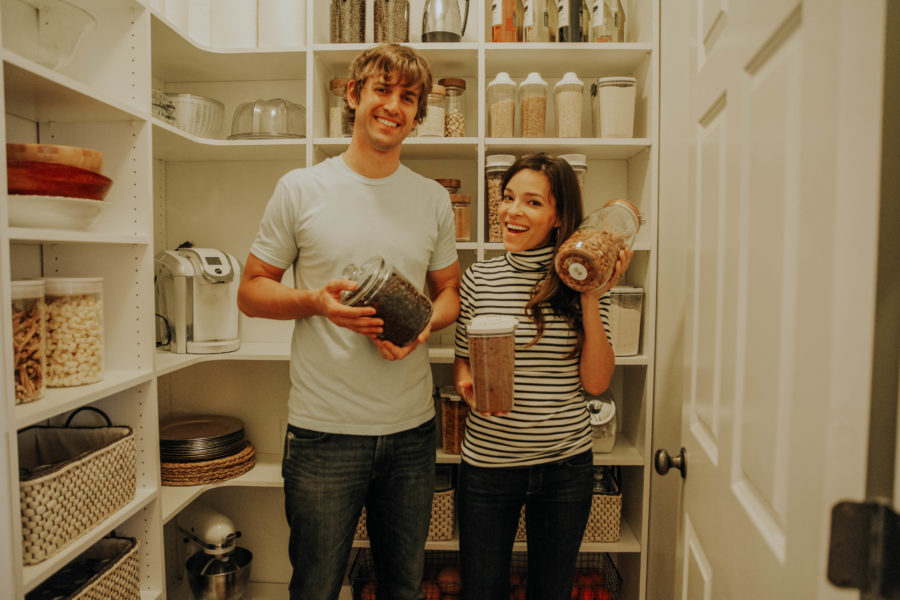
The total cost of the re-build was a little over $500, not including the flooring costs, and I know I will be forever grateful to Gabe for giving us more space to stock up on copious amounts of the G.H Creters popcorn from Costco. But truthfully, so grateful to have a little more flexibility to buy items in bulk and see everything in one place. I have a feeling it will lead to less waste and more motivation to cook! Let us know if you have any questions at all, and we would be happy to answer.

Thank you to The Container Store for teaming up with us for this post!

Leave a Comment

  • I’m so jealous of how tidy and uniform everything looks! Really like that you used matching baskets and matching jars. The colours are very nice, too. 🙂

    Charmaine Ng | Architecture & Lifestyle Blog
    http://charmainenyw.com

  • The real question is how do you lug laundry for 7 people up from the basement!? That is a true miracle! If it were me the basement would become the “dressing room” lol! Pantry looks beautiful!

    • Ha ha! A valid question! Well thankfully the boys bedroom is in the daylight basement as well, and being the main laundry offenders, it doesn’t feel too bad yet! A laundry shoot is sounding appealing though…

  • Andrea Whalen

    It looks amazing… What a great idea. Super jealous of your organization… Lol

  • Your pantry is beautiful! I totally would have made the same switch! I can’t wait to see what your new laundry room looks like!

  • Most important question- what are the chances Gabe can come to our house and guide my husband through the build-out process? haha
    It looks so amazing! And I’ve been dying to see how it turns out since we’re in the process of figuring out how to best design shelves for our laundry room turned pantry!
    Thanks for the inspiration! 🙂

    • Gabe Liesemeyer

      I may not be able to be there in person, as I assume you are not in our area, but I would love to help in any way I can from a distance. We are only an email away if you or your husband have any questions or need direction.

      • Meagan Buddenhagen

        Where did y’all purchase the adjustable shelves from?

  • Insert drool emoji!! Looks amazing!!!

  • this cute cat, I have a female cat at home, would be very suitable if his partner is this cat, so cute bhagaikan king of all cats

  • This is so well done! We’re doing a blog post in a few weeks on kitchen & pantry organization and would love to feature your pantry in it if that’s alright. It is total organization goals!

  • Jacqueline

    What are the dimensions of the pantry?

    • Gabe Liesemeyer

      Hi Jacqueline, the room is about 5ft 6in square. The shelving unit’s hight is 8ft and depth is 11 3/4in.

  • […] an inspiringly beautiful pantry design that makes me want to put everything i own in […]

  • Looks amazing! We are slowly starting to do this with our pantry and my biggest question is:
    Where on earth do you keep overstock bulk food?

    • Gabe Liesemeyer

      Hi Katie, thank you very much. We have an old clunker fridge in the garage for bulk cold items. Diapers and paper products that we get in bulk are on shelves next to the garage fridge. Bulk snacks are in the new pantry, but to be honest our kids are snack addicts, and we go through snacks faster than we can stock it. But that seems to be the case with most of the food in general.

  • […] 5. Laundry Room to Walk-in Pantry Conversion […]

  • […] 9. Laundry Room – Our laundry room was moved to our basement so we need to spackle walls, paint, add countertop area, and […]

  • Terrific work done with love and attention to every detail. Kudos!
    Quick question however, what is the colour used on you laundry room cupboards?
    Thx

  • Stephanie Wesztergom

    Where/how did you relocate your laundry appliances?

  • Itumeleng sekete

    Wow!I have never see such a beauty

  • It looks beautiful! Where did you get the predrilled melamine boards? Thank you!

  • How did you secure the vertical boards together/to the wall? Did you just attach them to the base or did you secure them at the top or to the wall as well?

    • Gabe Liesemeyer

      Hello Abigail, I am so sorry that I missed your question. It is secured at the base and on the top using corner braces attached to the studs. In our case it was not fully needed because the L shape of the unit kept pressure on the walls in opposite corners.

  • We love your design of the pantry. We are planning on doing something similar. Only snag we ran into is drilling through the holes. How did you divert the melamine chip out.

    • Hey Brennen, thanks for the question. I find the best way to prevent the chipping is to:
      1. be sure you are using a high quality carbide tip braid point but to cut melanine board. Freud makes one that I really like. I think I linked it in the how to post, but I will double check and if not I will add it as a second reply below.
      2. Place a board below the melamine and clamp the two together good and tight. Having the pressure on the back side helped to prevent the chips. Do not clamp the whole board together but only in the immediate area where you are drilling. I used two clamps with about 6 hole spaces between. Drill those 6 holes and move the clamps down accordingly/gradually to ensure tight backside pressure. The sacrificial board underneath needs to have a nice smooth surface. I used some cheap MDF for that purpose. Some chipping still occurred, but it was kept to a minimum.
      3.Adding some painters tape to the back of the melamine would have helped a bit also. Once it is up some minor chilling will be hard to notice. A tube of white Seam-Fill can help to cover up the chips.
      Hope this helps let me know if anything else comes up.

      • It looks like I didn’t link it, so here it is. sohttps://www.amazon.com/gp/product/B000UD077S/ref=ox_sc_act_title_1?smid=ATVPDKIKX0DER&psc=1

        To secure the boards I now use the cam and dowel fittings below instead of the coarse screws. It is more prep up front to align and drill the holes for the fittings, but makes construction easier/faster in the end. CMT makes some forester bits that work well for the needed holes. Let me know if you are interested and can look them up. Check out the link for the cam and dowels.

        https://www.amazon.com/gp/product/B00VG0HMMC/ref=ppx_yo_dt_b_asin_title_o00_s01?ie=UTF8&psc=1

        If you have to cut the melamine boards, I found that wrapping the cut area in painters tape and using a finishing saw blade with High tooth quantity worked well. I bought a Diablo blade.

        • This is great info, but im not quite following. What pieces did you attach to the walls and floor in order to secure the melamine panels? Some more detail on how you attached the vertical boards would be great!

          Thanks!

          • Hi Neil, the vertical boards extend all the way to the floor so I did not secure them directly to the floor. I did rip some scrap mdf to about 3.5 in wide and the length of the shelves, and secured them to the vertical boards using L brackets to create a makeshift base. The third picture of the post is a progress photo and shows what I am referring to if you look at where the corner of the pantry shelves would be. You could easily secure the vertical boards to the floor using more L brackets if desired.

            Because the unit sits on the floor, and because it is in a corner unit extending from wall to wall, it only needs to be secured to the wall in order to prevent the unit from falling over. (in my case this was not really needed because of how tight it fit into the corner, but it doesn’t hurt to be extra careful.) Once I secured the top boards to the unit (which was my last step of construction before adding the trim to the bottom) I secured the whole unit to the wall by adding L brackets to the top board and then screwing the bracket into the wall studs.

            If you are referring to how the vertical boards were held upright during construction, they were simply propped up against a wall or ladder. Start with one of the end vertical panels and stand it up in the corner as straight and tight in the corner as you can. Then attach boards at the bottom to create your base (as mentioned in the first paragraph of my reply). Take a second vertical board and prop it upright against a ladder at the opposite end of your base and attach. Use a carpenter’s square to insure the angles are truly 90 degrees. I then secure one horizontal shelf to both of my vertical boards roughly 40in up from the floor and another roughly 16in from the top. Continue to add base lengths, vertical boards, and shelf lengths to your finished section. As mentioned in the reply above I highly recommend using using cam and dowel fasteners when permanently affixing the horizontal shelves and top boards to the vertical boards.

            I hope that is not too confusing. Please let me know if I did not answer your question.

  • Thanks for this. It really helped convey to our custom builder contractor exactly what I wanted for the corners of our pantry.

    • You are so welcome! Thank you for using us as an example. We hope it turns out, and please send us a picture when finished!

Copyright © 2024 In Honor Of Design powered by chloédigital